

How Can You Register Your Device To Sap Cloud Platform Internet Of Things?
This article can help participants in the SAP Coder 2017 competition solve one of the problems
The Net of things is an exciting topic that volition change the world tomorrow. Existing IoT platforms permit you to test the engineering science, which we will practise.
Hither is a footstep-by-step instance of creating and configuring a system for collecting data from Arduino-based devices and connecting information technology to the SAP Cloud Platform. IoT is the most promising topic of the next decade. The well-nigh important catalyst for the Net of Things has been the dramatic fall in prices for miniature sensors, microcontrollers, RFID sensors, and memory chips. They can be put in hundreds, thousands. For example, about 30,000 sensors are installed on the oil platform. Just only 1% of the information taken from them is actually used to command the platform and observe emergency situations. There is infrastructure, but IoT applications are not enough.
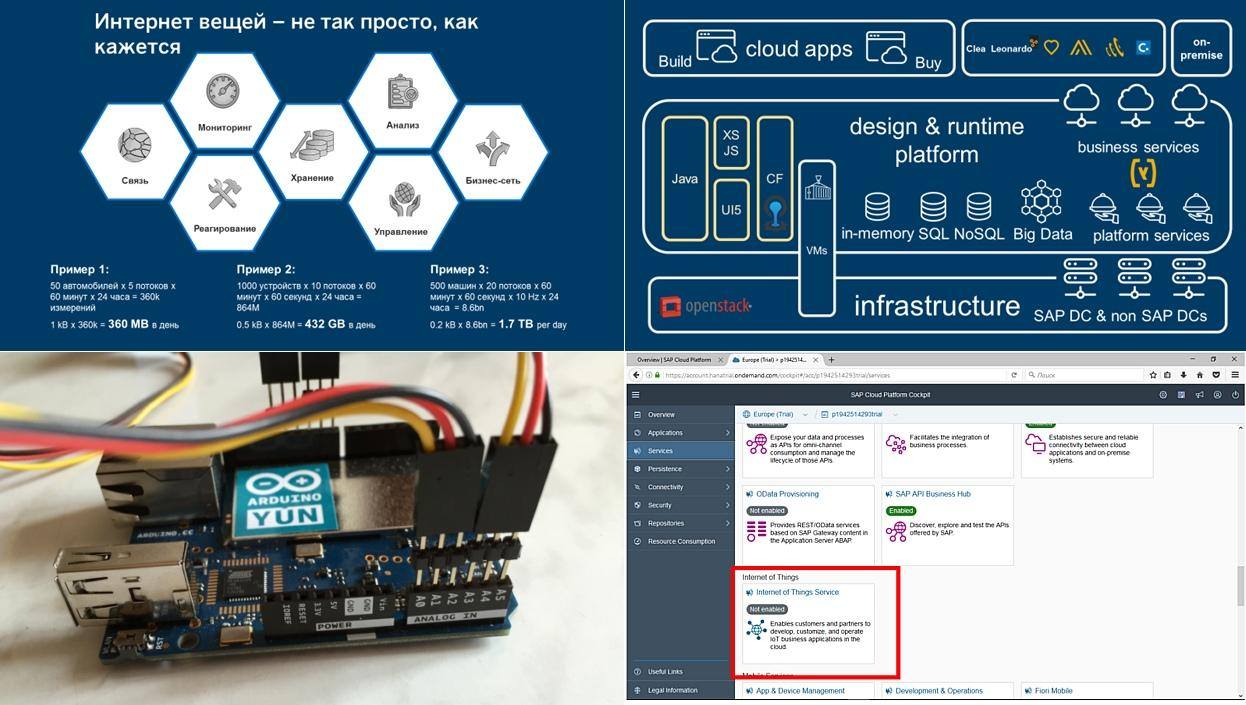
Co-ordinate to analysts, the global IoT market will grow to $ 10 trillion by 2025, and the industrial segment will eat up most of the pie - 69%. All major IT developers are urgently building their platforms for deploying IoT. Today we will piece of work with one of them - our cloud-based development platform SAP Deject Platform. It includes a set of tools and services that let you to quickly create your own Cyberspace of Things projection from prepare-made blocks and templates.
SAP Cloud Platform supports OpenStack engineering, which makes it independent of equipment infrastructure. When developing applications, y'all can employ various technologies for working with information - both conventional relational DBMSs and DBMSs with majority storage in RAM (SAP HANA), likewise as mechanisms for working with unstructured "big" HADOOP information. Of the programming languages, Java, Coffee Script, XS JS are supported, so it volition exist easy to start coding. But the master value of the platform is a set of gear up-made business organization services that can significantly reduce application evolution time.
This article will focus on the basic features of the Internet of Things service, which allow you to collect data from equipment and sensors. Further evolution of the SAP IoT line volition allow you to use ready-made libraries for working with a wide range of equipment and templates for developing typical IoT applications, for instance, creating applications for monitoring the functioning of the car and forecasting emergency situations.
Almost all SAP technologies are available for report. To go acquainted with the platform, only register on hcp.sap.com and become a test business relationship. You tin can also try your hand at creating on-prem applications based on HANA Express , which y'all tin can deploy to your personal computer.
Only plenty lyrics, permit'south create our kickoff IoT solution based on the SAP Cloud Platform. For instance, we'll develop an option when temperature and light levels are collected past the controller on the Arduino. And so they are transferred to the "cloud" of SAP, in which y'all tin run across the information in the form of a table and graph.
Stride i. Annals in the deject service SAP Deject Platform
To register with the SAP Cloud Platform, get to:
https://hcp.sap.com . Free registration will permit you to use all the features of the SAP platform in a demo mode.

Click the Try for Complimentary button, then Endeavour Now.
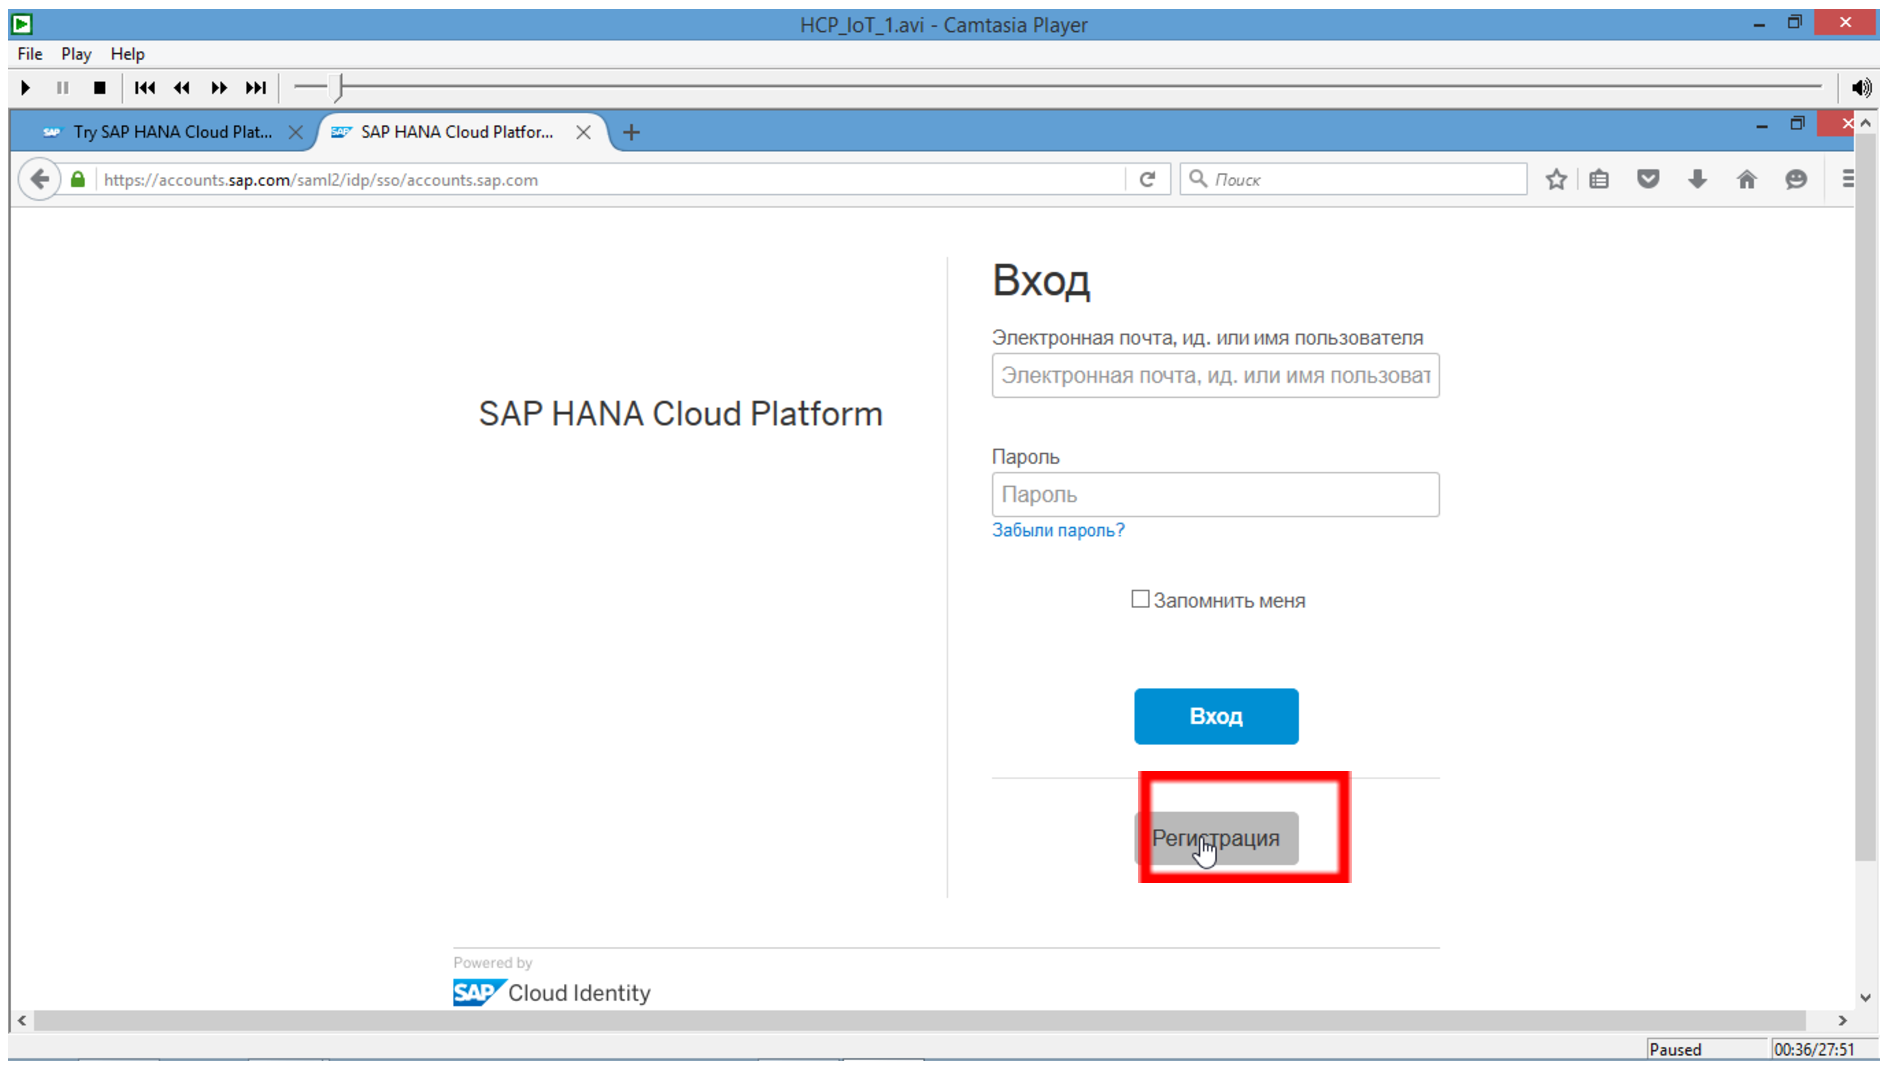
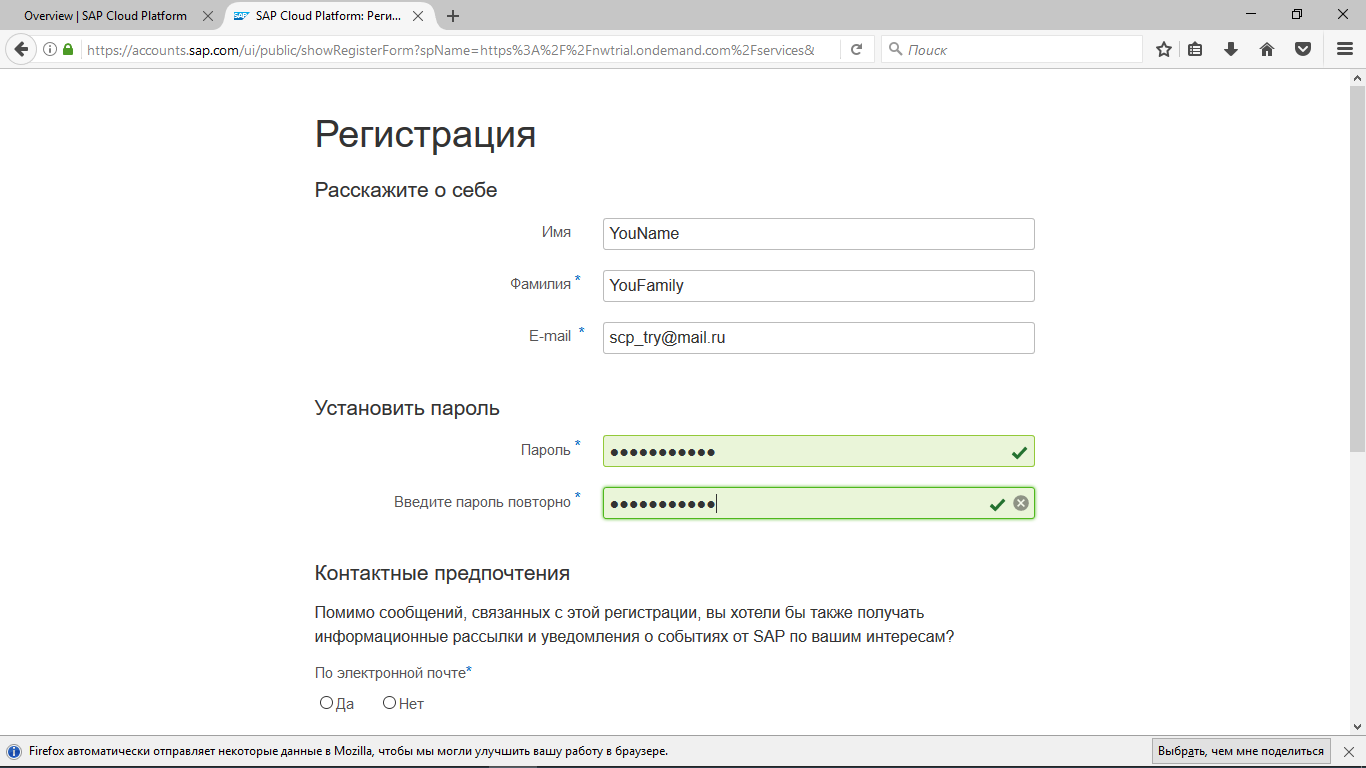
Click the "Annals" push and enter your registration data.
A confirmation email must be sent to the indicated email address. To complete the process, you demand to activate your account by clicking on the link in the letter.

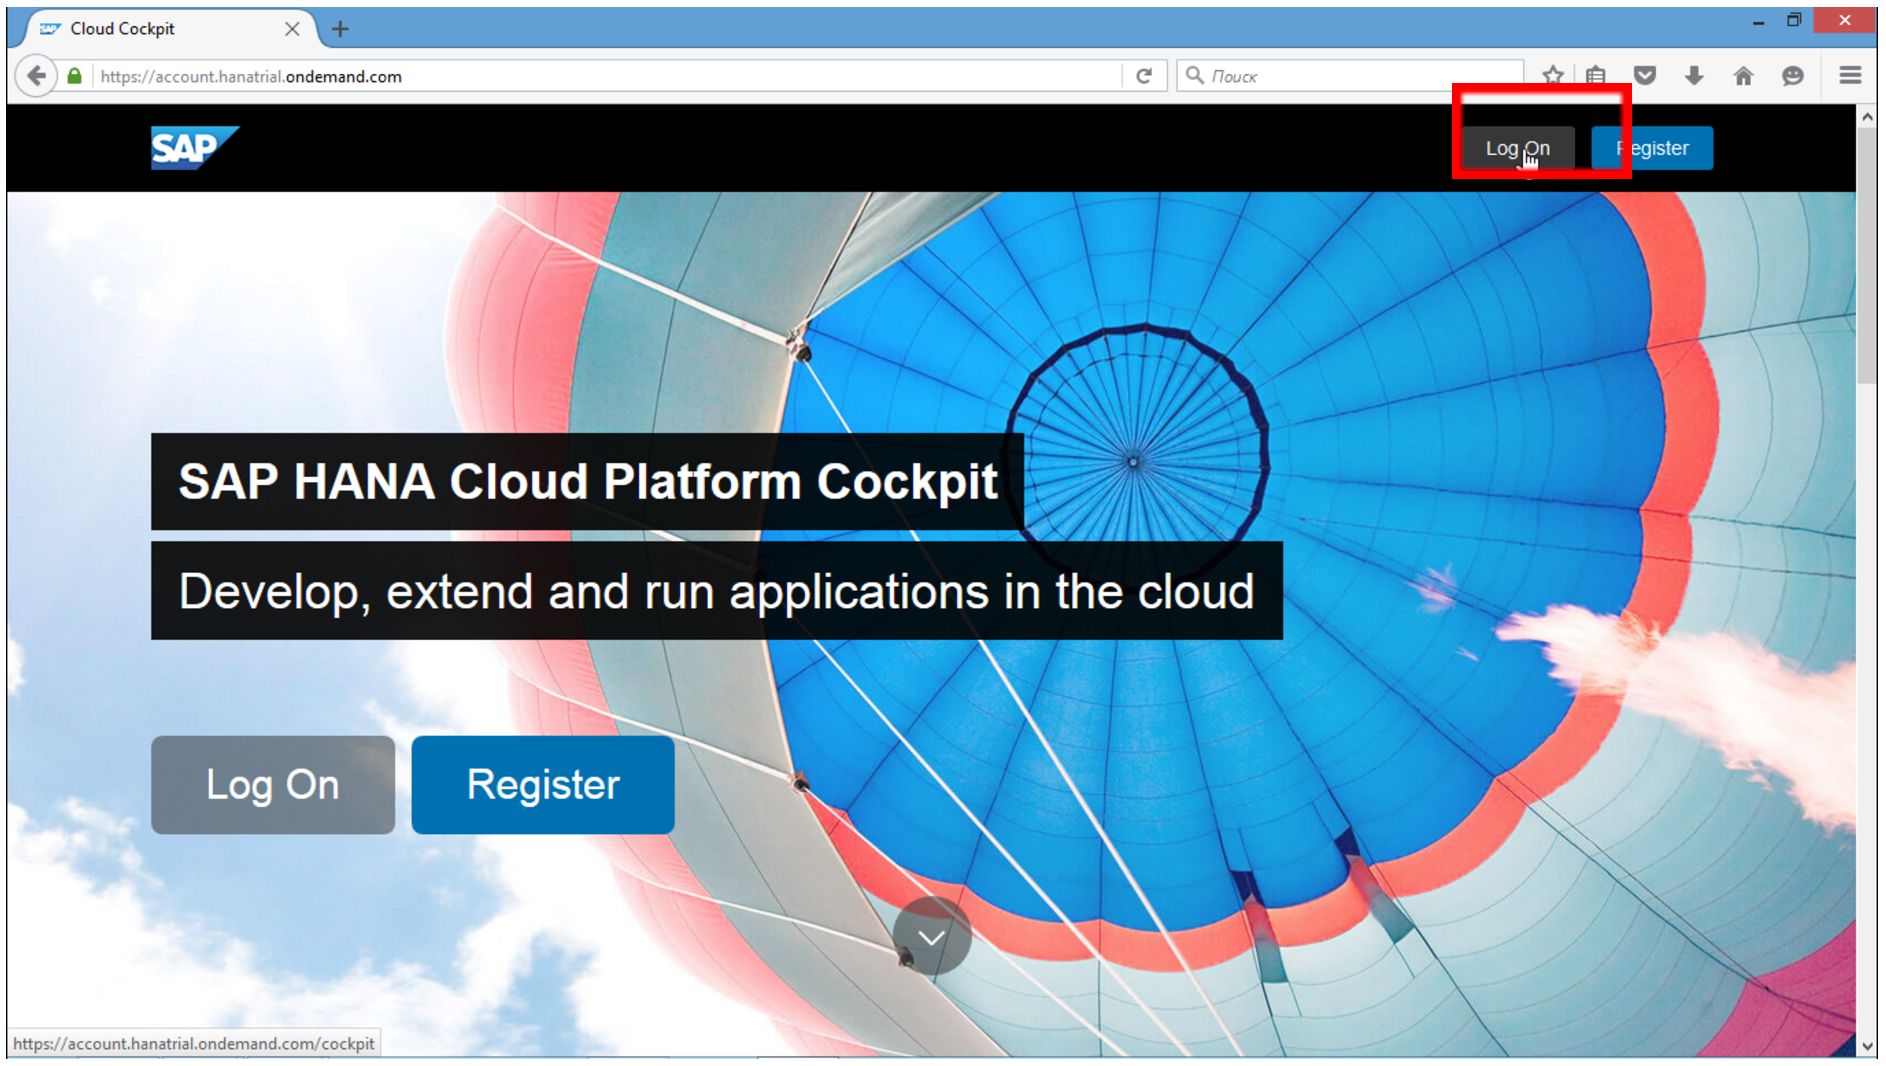
Everything is set to use the SAP Deject Platform! Permit's go to the control console and create our first IoT application. Click Log On.
Step ii. Nosotros create a database and give out rights
You lot detect yourself in the "control console" of your developments on SAP.

It allows you lot to see all adult applications, access the database, start development or activate services.
In principle, the IoT service will be able to automatically create the necessary table construction and database case. Just in order to understand how information technology works and fully manage the database, we volition create our own HANA case. The then-chosen HANA MDC - Multitenant Database Containers.
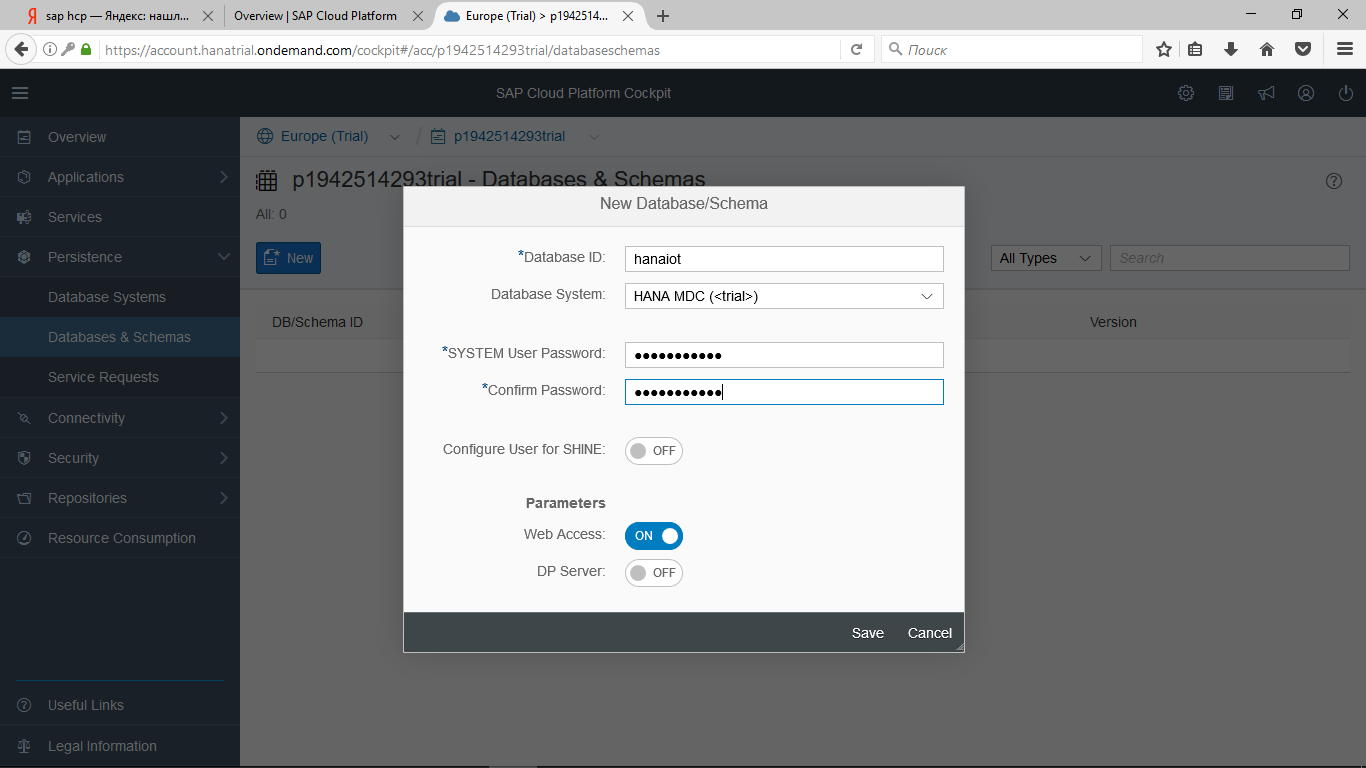
It is in this system that our data will exist stored. To do this, we go to the tab Persistence -> Database & Schemas and click the New push.
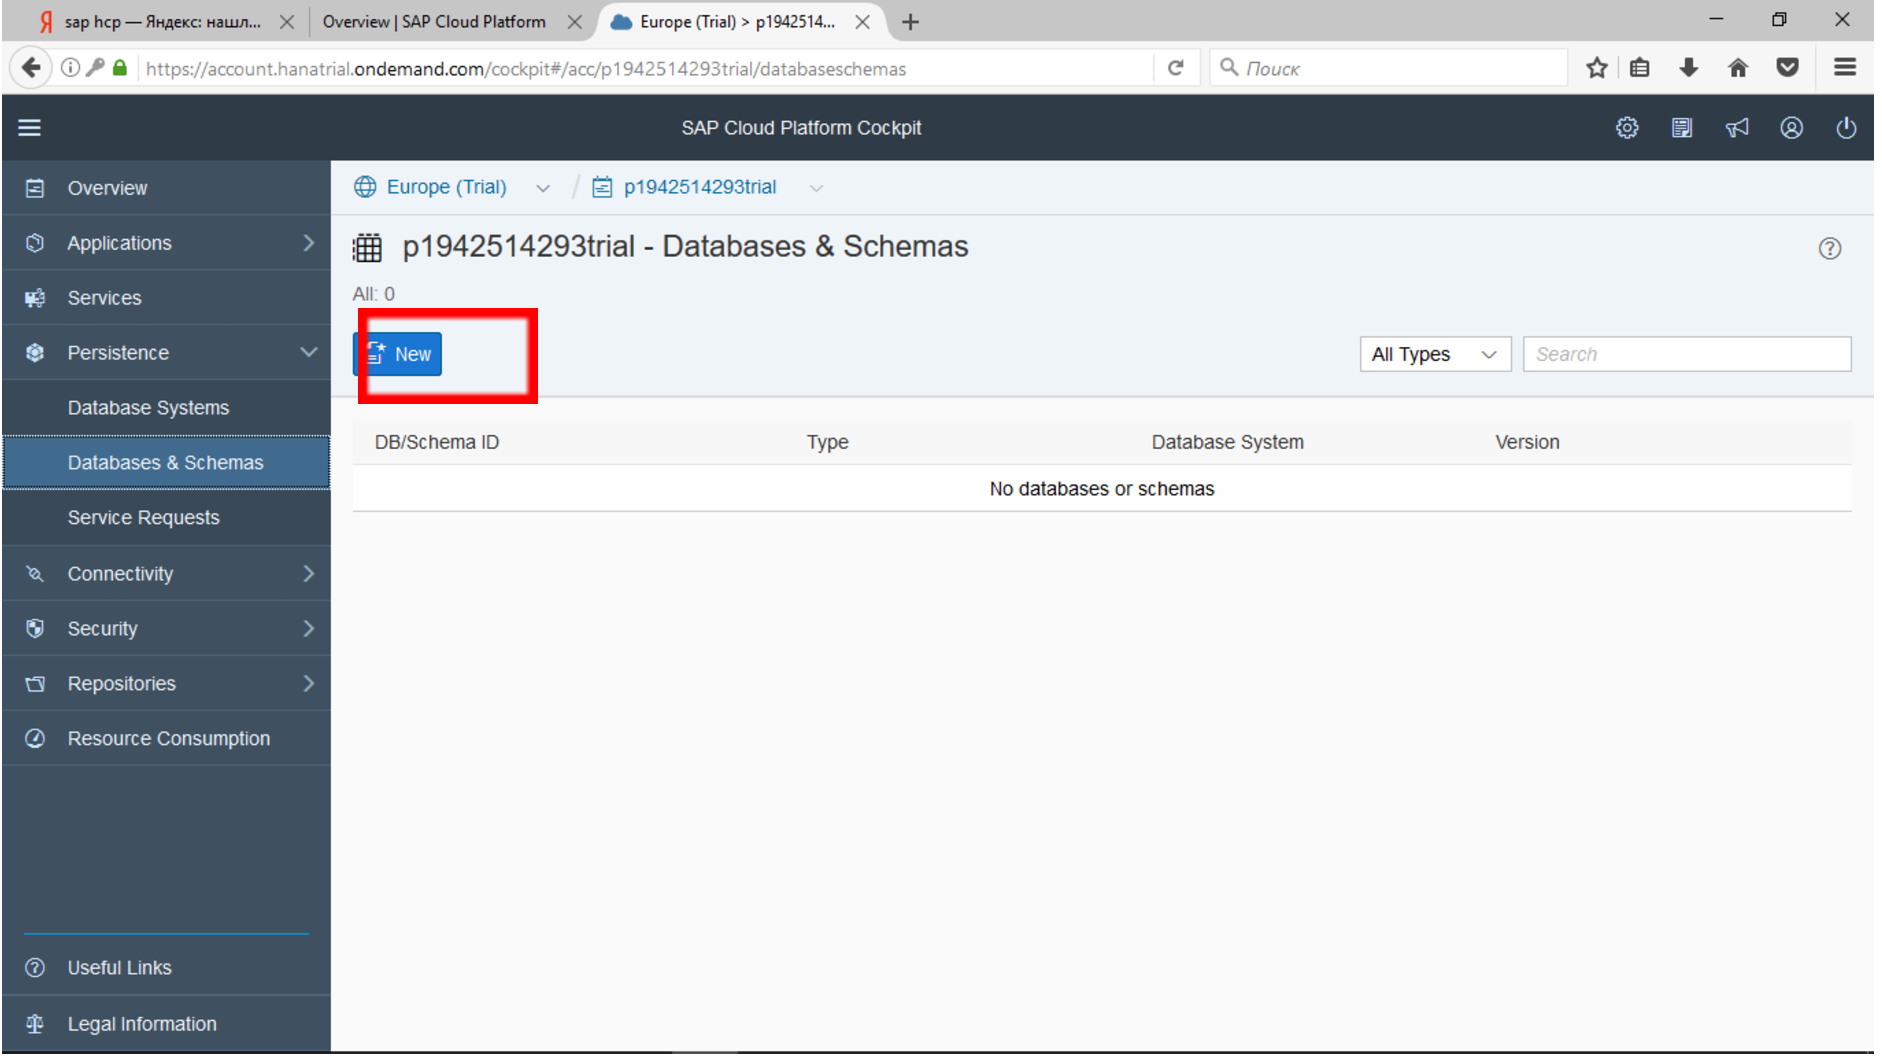
After that we set any name for the HANA case. The proper name must exist written in modest Latin messages without the use of special characters. Equally the Database Arrangement, select HANA MDC and set the password for the SYSTEM user.
In a cloud surroundings, a database instance is created, with which we volition work. Delight note that this took united states only a few minutes. This is a huge reward of cloud technology. Usually, in guild to install the database on the server and configure it correctly, the ambassador may need several days. And here - one click and you lot're done!
When the instance is ready, the yellow CREATING icon will change to greenish CREATED, and we will exist able to manage the structure of the database.

We volition use web-based database structure direction tools. In the future, in addition to the congenital-in database tools, you can configure the Eclipse environment, as described in the article " Creating a HANA Awarding Using the Eclipse Development Environment ".
First, click on the SAP HANA Cockpit line. The arrangement will upshot a alert about the lack of rights.

Click OK, and you will automatically be given the right to piece of work with Cockpit.

In this tool, you can view and configure many parameters for working with your HANA case.
To work with the SAP HANA Web-based Development Workbench, you lot need to add some rights to the system user. Click on the "Manage Part and Users" tile.

Select Organization, and on the Granted Roles tab, click Plus. Of form, for productive systems yous will need to create a new user and give him the required rights. But now we are making our offset application and we can deviate a footling from the rules.
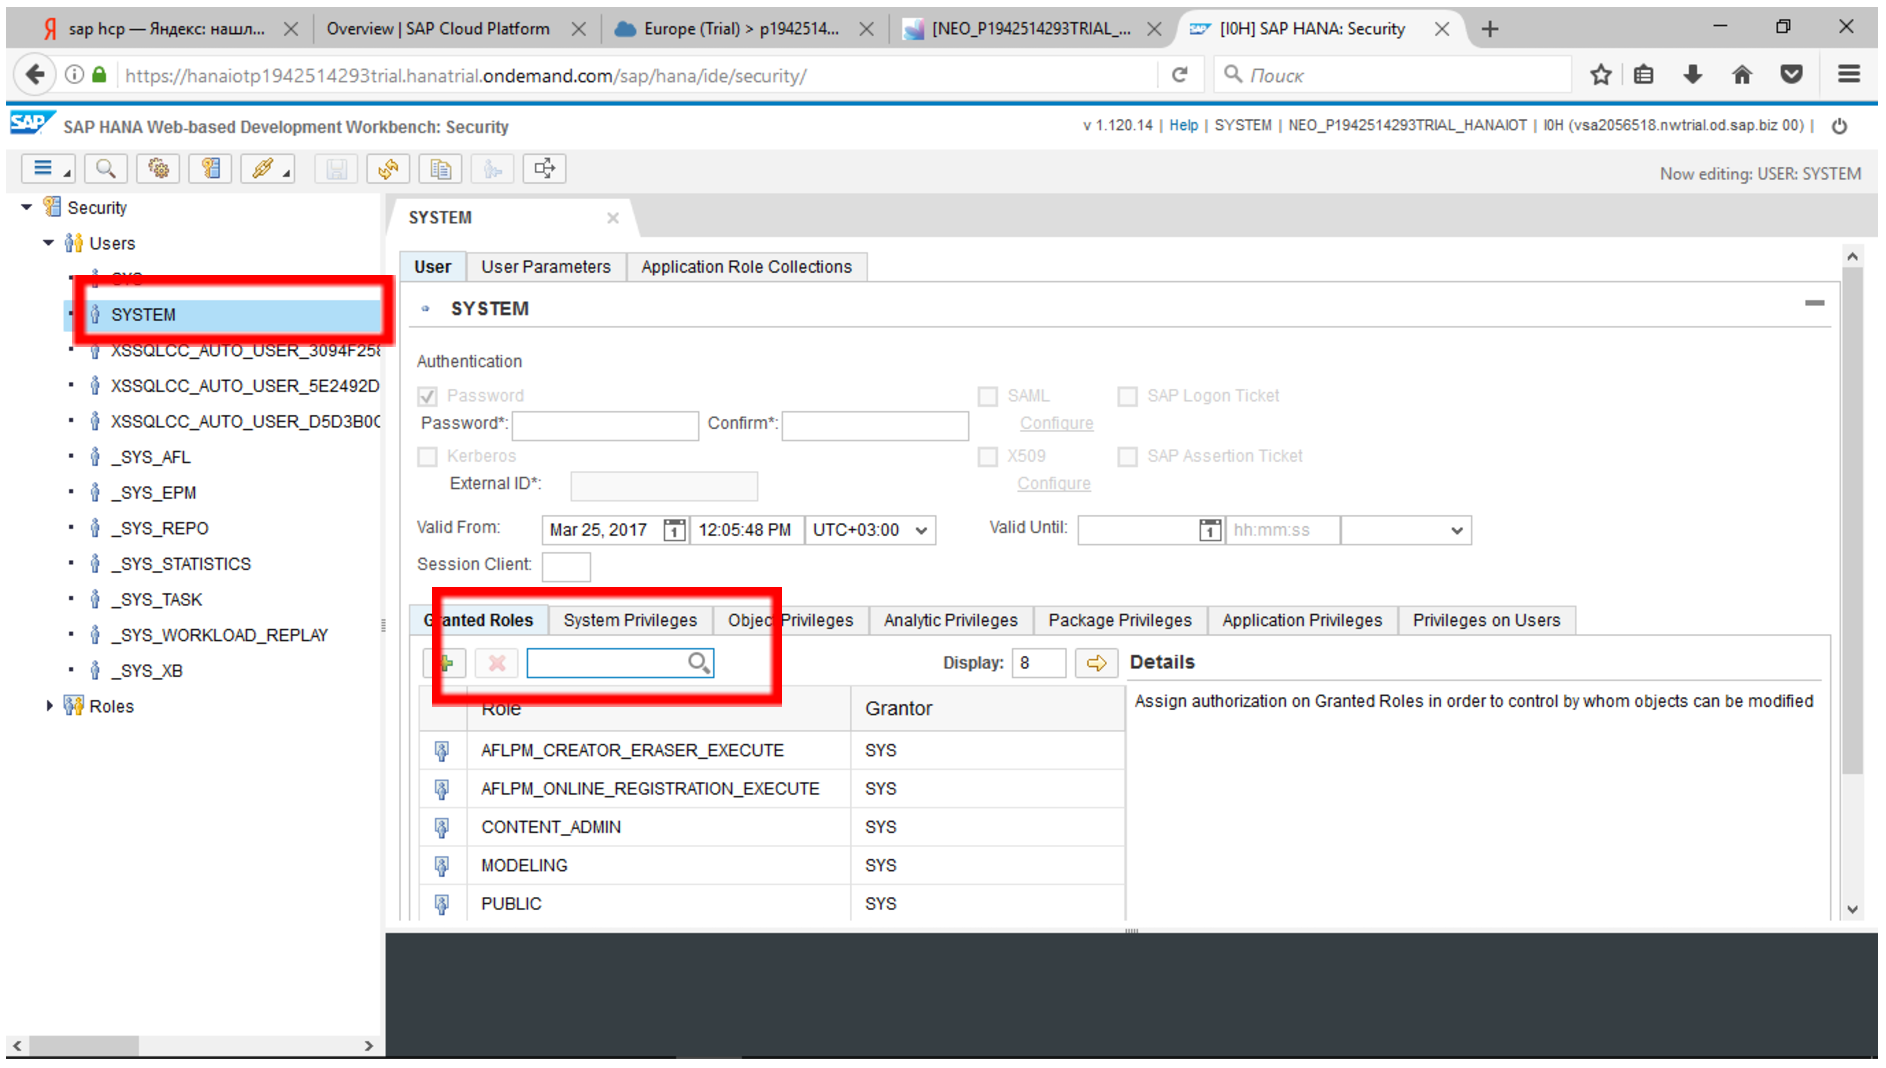
The rights required for the administration tool to work are described here .
Give the following rights to your user:
| Part | Clarification |
| SAP HANA Web-based Development Workbench | |
| sap.hana.xs.ide.roles :: EditorDeveloper or parent roles sap.hana.xs.ide.roles :: Developer | Use the Editor component of the SAP HANA Web-based Development Workbench. |
| sap.hana.xs.debugger :: Debugger | Debug server-side JavaScript code |
| SAP HANA XS Assistants Tool | |
| sap.hana.xs.admin.roles :: HTTPDestViewer | View HTTP destinations. |
| sap.hana.xs.admin.roles :: HTTPDestAdministrator | Total access to HTTP destination configurations (brandish and edit). |
| sap.hana.xs.admin.roles :: TrustStoreViewer | Read-but admission to the trust store, which contains the server's root certificate or the document of the certification say-so that signed the server's certificate. |
| sap.hana.xs.admin.roles :: TrustStoreAdministrator | Full admission to the SAP HANA XS awarding trust shop to manage the certificates required to start SAP HANA XS applications. |
After adding the roles, click the "Salvage" push. Your user volition be added the rights necessary to work. Now you can return to the initial screen of the SAP Deject Platform and select the line SAP HANA Web-based Evolution Workbench.

A page with a prepare of services will open up.
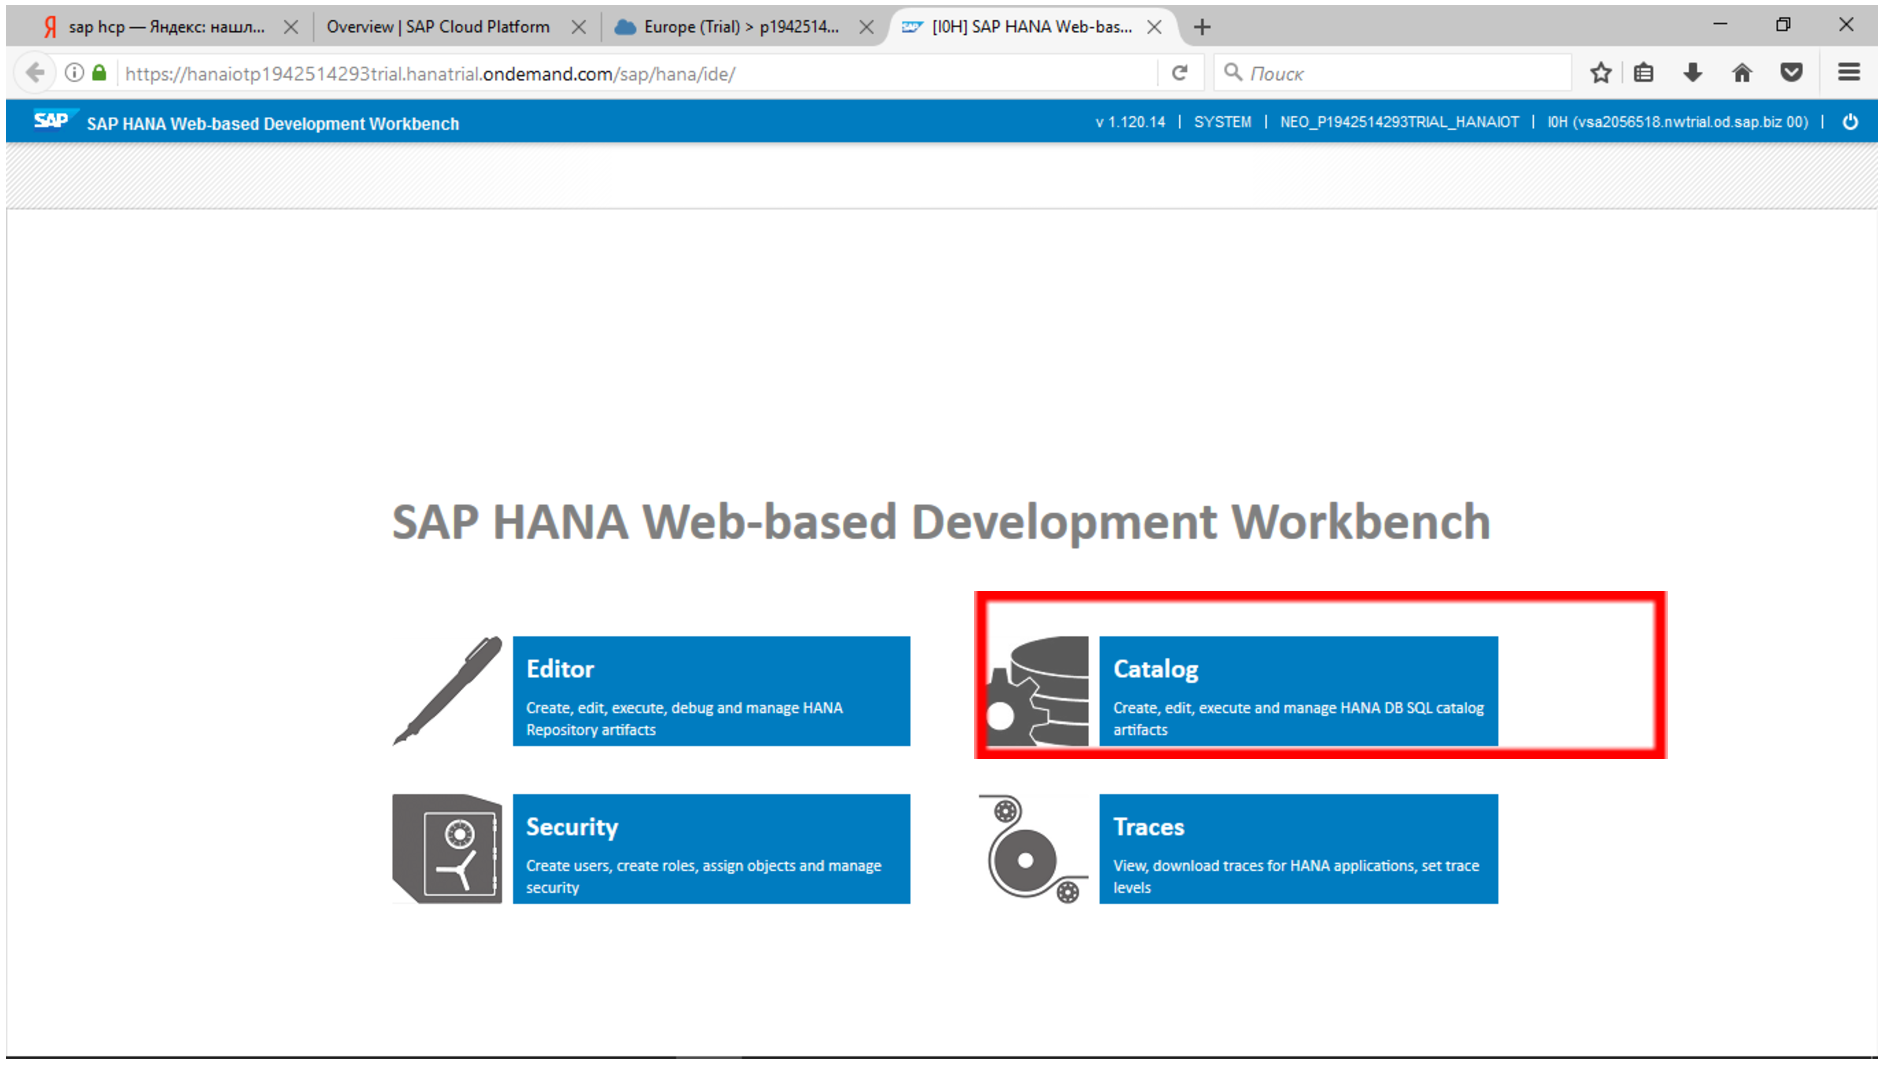
Past clicking, for example, the Itemize tile, y'all tin see the construction of the database: tables, view, packages.
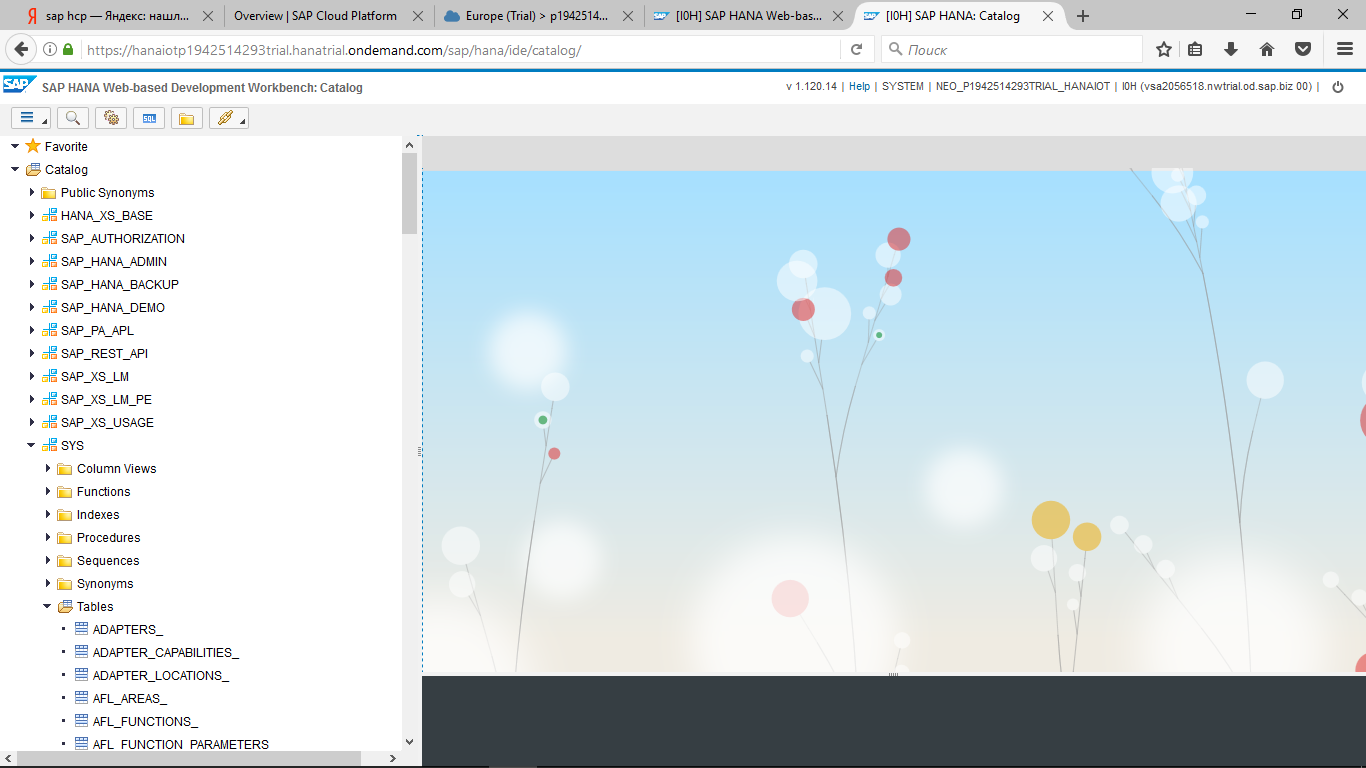
With the assist of this tool, we can see in the time to come how the data from the connected sensors autumn into the special table created by the IoT service.
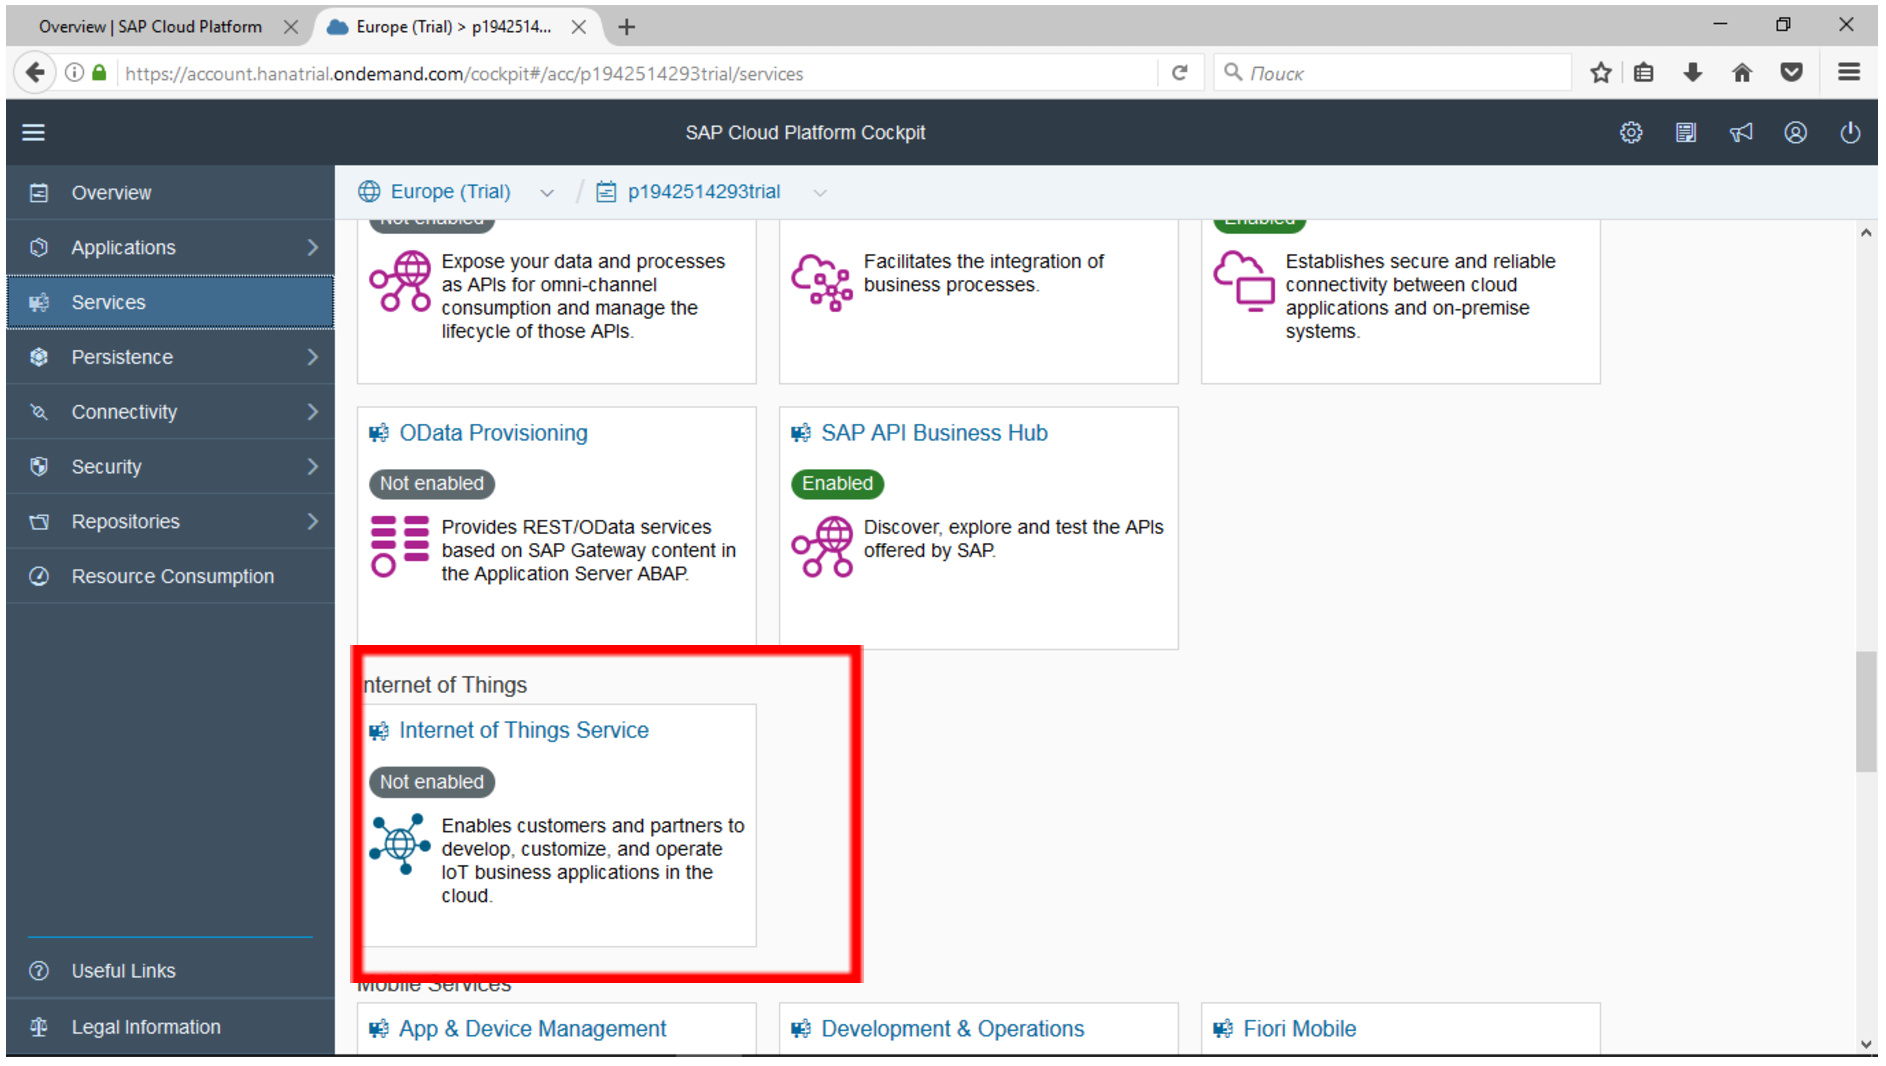
Step iii. Activate and configure the SAP Cloud Platform for IoT service
Now our newly created database is ready to receive data. Go to the Services tab and coil through the listing of services that you lot tin can use, find the Internet of Things service.
As y'all can see, it does non work yet. Allow's actuate information technology. Past clicking on the service, we will go to the settings panel, where we must click the Enable push to start information technology.
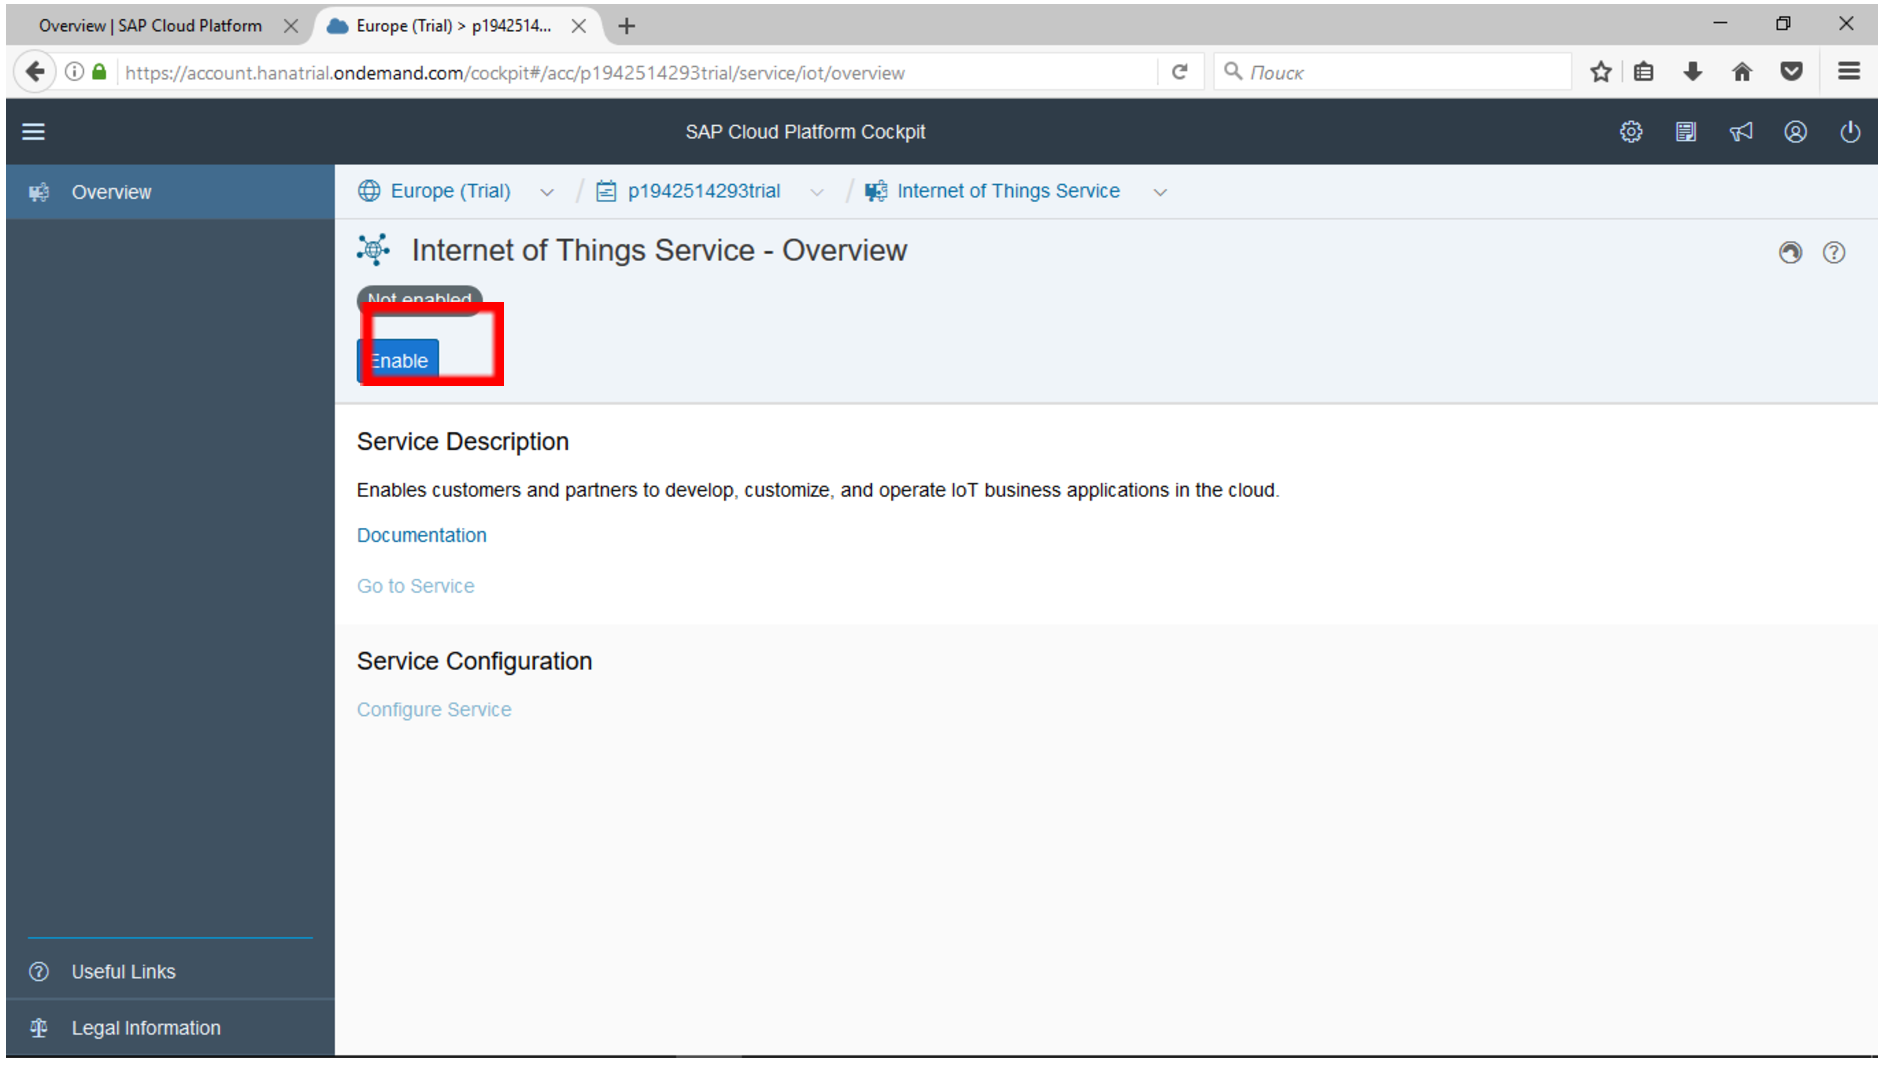
After a while, you volition see a dark-green Enabled text. This means that the service is ready to become. It is this service that will collect data from sensors and store them in the database. It will automate near of the work and do it every bit quickly and conveniently every bit possible for the developer.
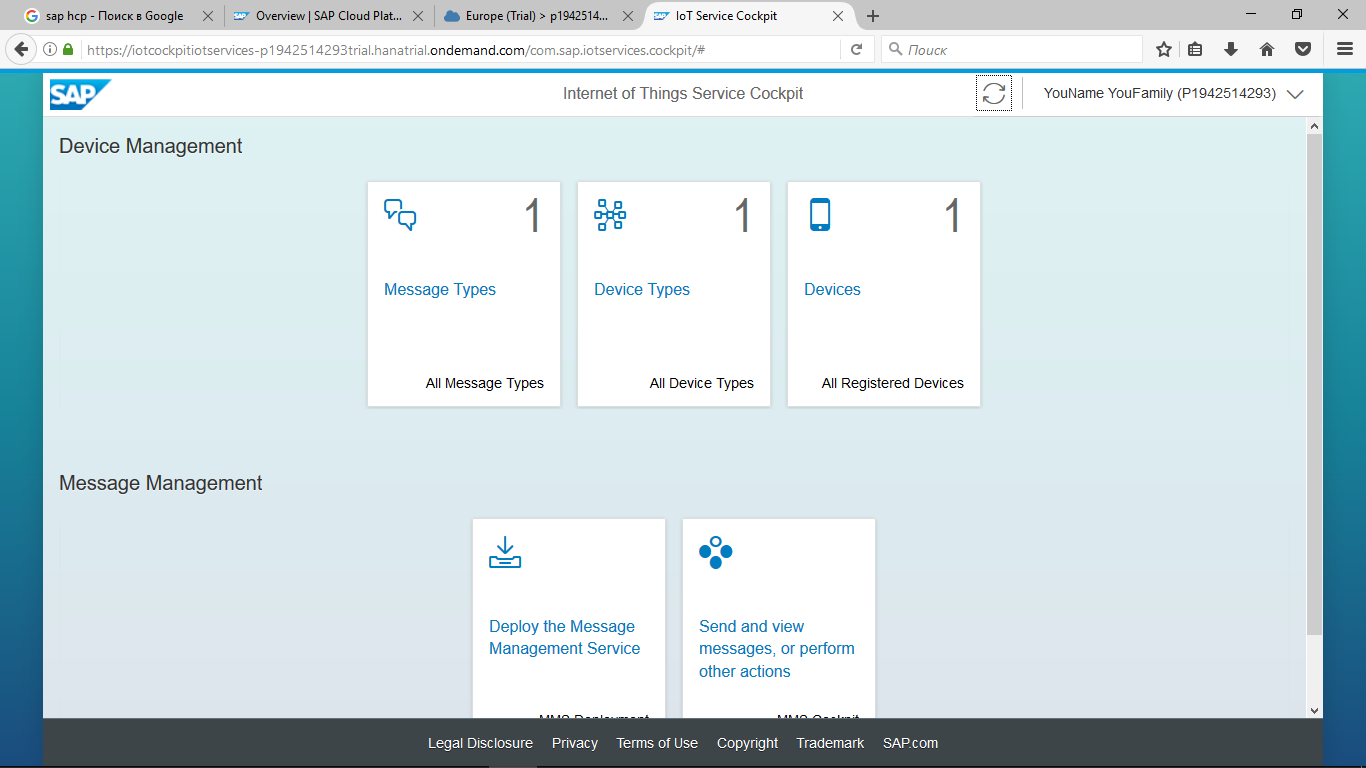
Permit'due south configure the service to receive data from sensors. Going to the IoT service direction tab, click the Go to Service link.

You lot will see a command panel for connecting external devices and sensors.

Every bit you tin see, the number 0 in all sections tells united states of america that no devices are continued to the service yet. What exercise the sections mean?
Device Types - types of devices. This is a full general clarification of the device form. For example, "Weather Station" or "Device for decision-making the line of painting."
Message Type - types of messages or information that the device tin can send or receive. For example, "Weather Data." At the same time, the "Atmospheric condition Information" type tin can transmit temperature, humidity, precipitation, atmospheric pressure, and so on.
Devices - a specific device with a specific number, which we will connect. For instance, "Weather Station No. 1 of VDNH", "Weather Station No. 2 of Vorobyovy Gory."
Deploy Bulletin – Кнопка запуска, при ее нажатии произойдет автоматическая настройка сервиса и активация работы.
Send and view letters – раздел, с помощью которого можно протестировать работу сервиса IoT. Мы сэмулируем работу датчиков (даже если у нас их нет), передадим сообщение в нужном формате и посмотрим уже переданные данные в табличном виде.
Давайте настроим наше устройство. Выбираем раздел Message Blazon и в нижнем левом углу появившейся формы нажимаем «плюс».

Создадим тип сообщений TempLightHumidity для типа устройства Arduino c двусторонним направлением передачи данных Bidirectional. Удаляем поле timestamp, которое отображается по умолчанию, и создаем четыре собственных поля:
Temperature тип Integer Calorie-free тип Integer Humidity тип Integer 
Click the Create button. Now we have created four fields in which we tin transmit information from sensors about temperature, humidity, and light level.
We return to the chief screen. We need to create a type of device that will collect information. Click Device Type and create an Arduino type with a bounden to the TempLightHumidity bulletin blazon.

The final step is to create an example of the device in the Devices section.

Fill in the name of the device - ArduinoForTraining and specify the data that it volition transmit - Arduino.
After saving the device, the organization will give out important information - Token, which will exist required later for the device to be able to log in to the SAP Cloud Platform system. Write it down.

If you lot forgot to write a token, you tin can afterward generate a new one by clicking on the Generate Token push button.
In addition to Token, nosotros will need ii more parameters: ID Bulletin Blazon and ID of the device example. The first parameter can exist institute on the "Information" tab in the message type.

The 2nd parameter is on the device instance folio.

In my case, the following parameters were obtained:
ID Bulletin Blazon = 3531068190e9d68c4a0a ID экземпляра устройства = 8a61bdd3-c50b-4585-a3f4-dba7f05af22e Token = e0b0dc97cc4913311a17cfcdb3f9321e At present all the settings are done.
Y'all can start the activation of the service settings by going to the Deploy Message particular.
Enter your data and password for the SAP Deject Platform organisation and click Deploy.

If everything is configured correctly, y'all will receive a message about successful activation.

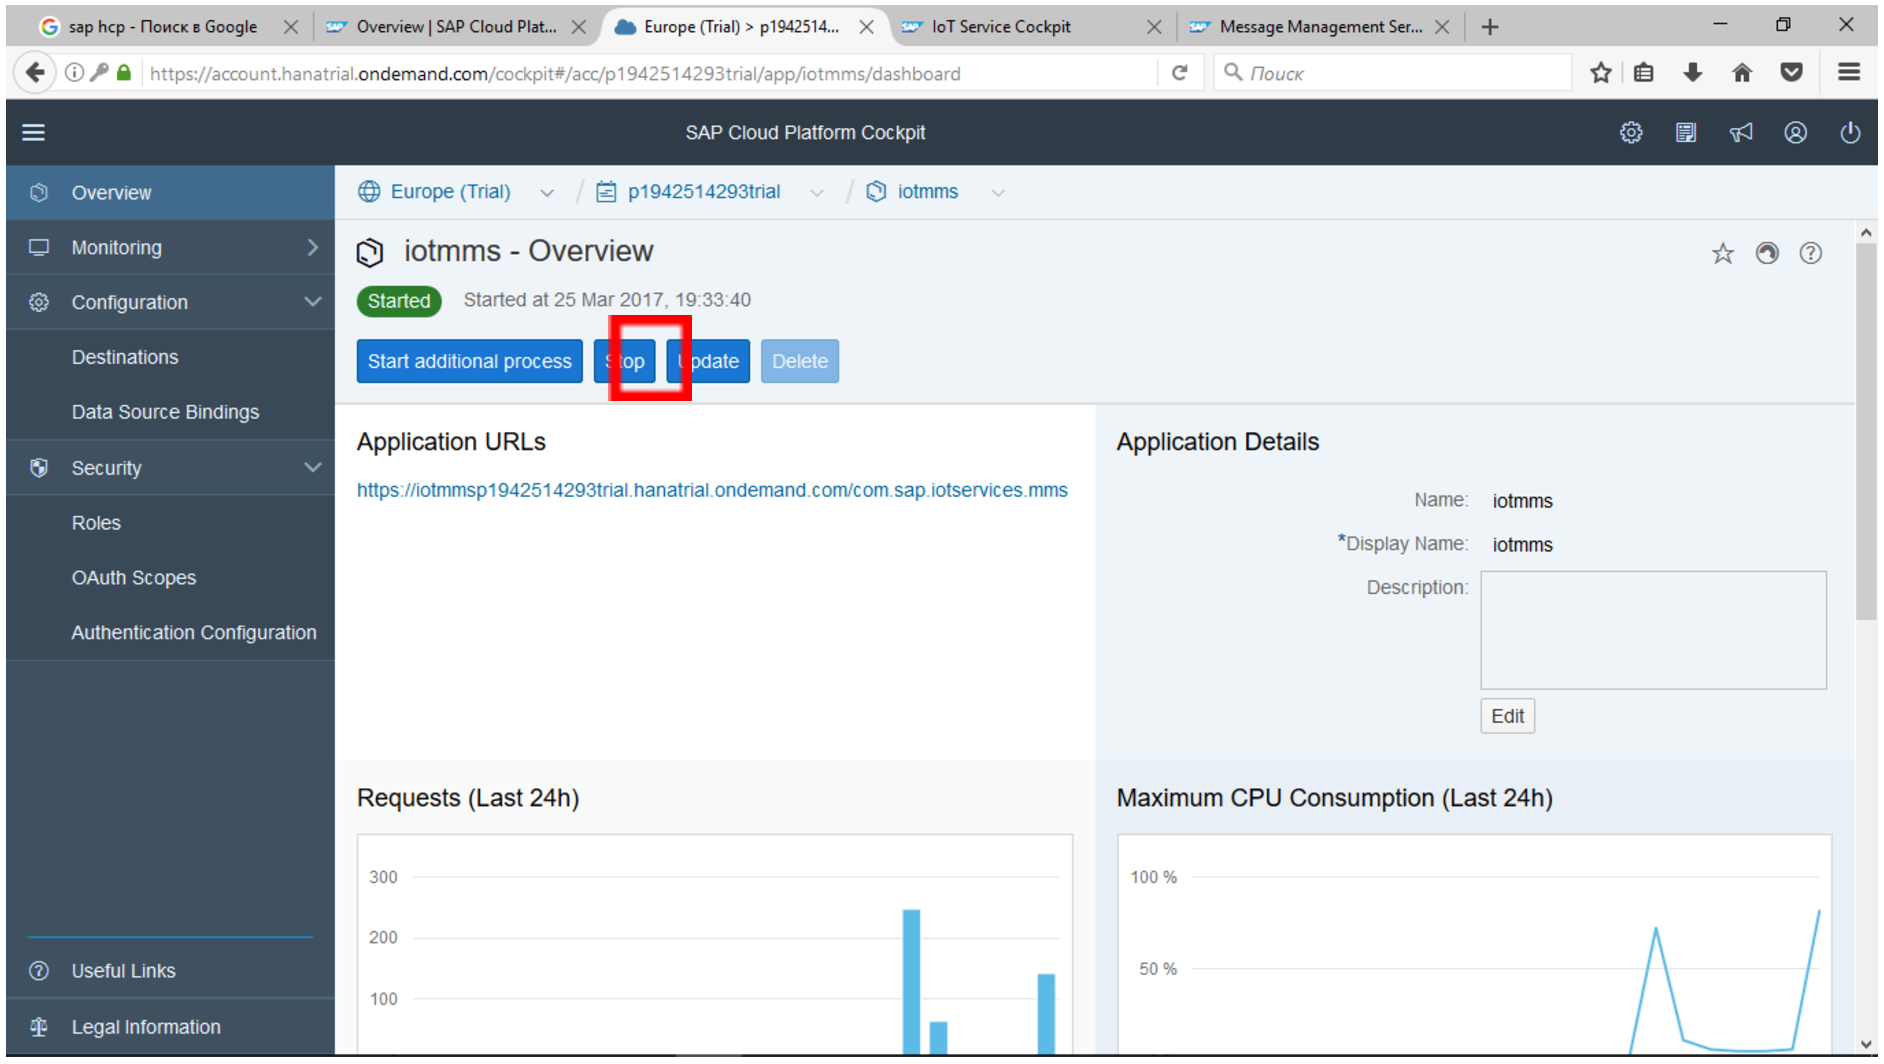
Let's go back to the SAP Cloud Platform control panel and go to the Java Application section. There y'all will see the new iotmms awarding.
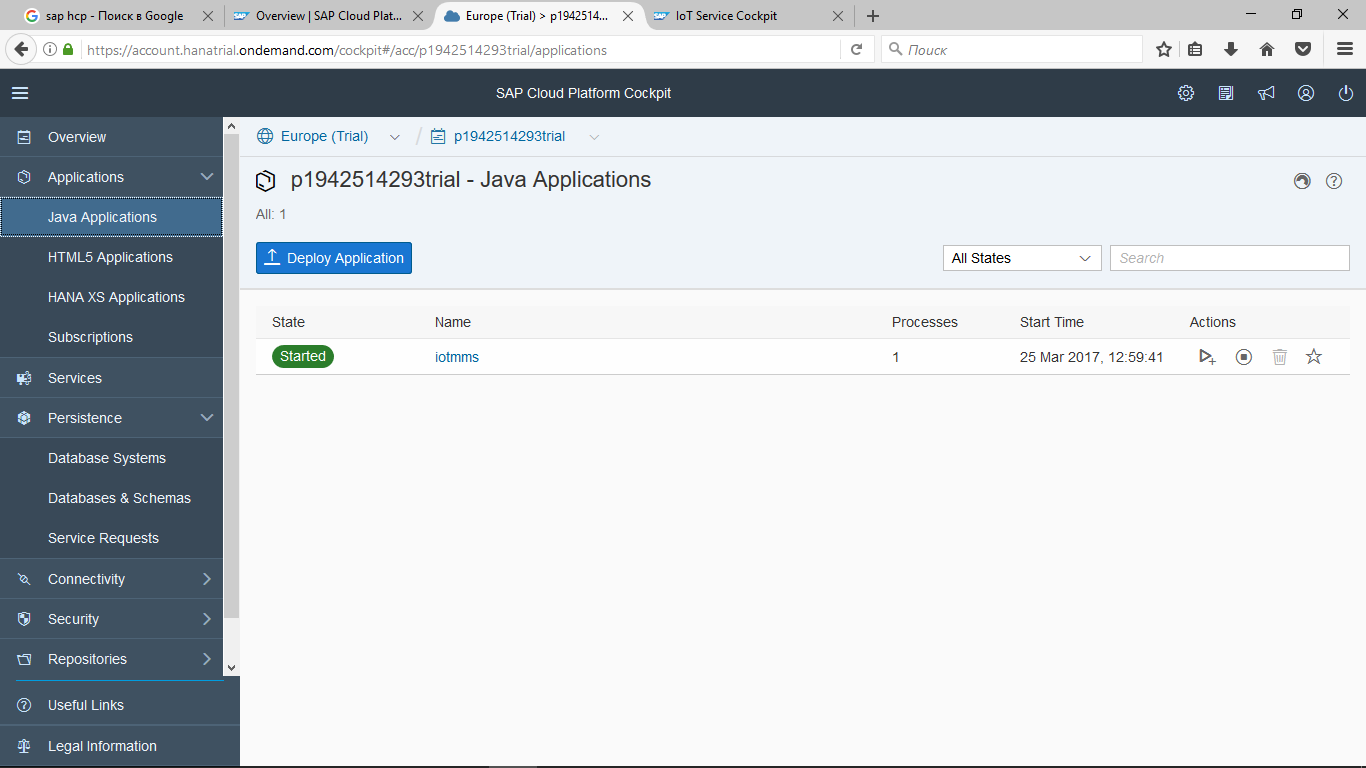
This is a special awarding that is automatically created by the system to collect data from sensors for the settings that you just gear up. While the condition of the application is "yellow" - information technology takes a little time to launch it. Later 1-two minutes, the application starts completely, which is signaled in green in the State cavalcade.
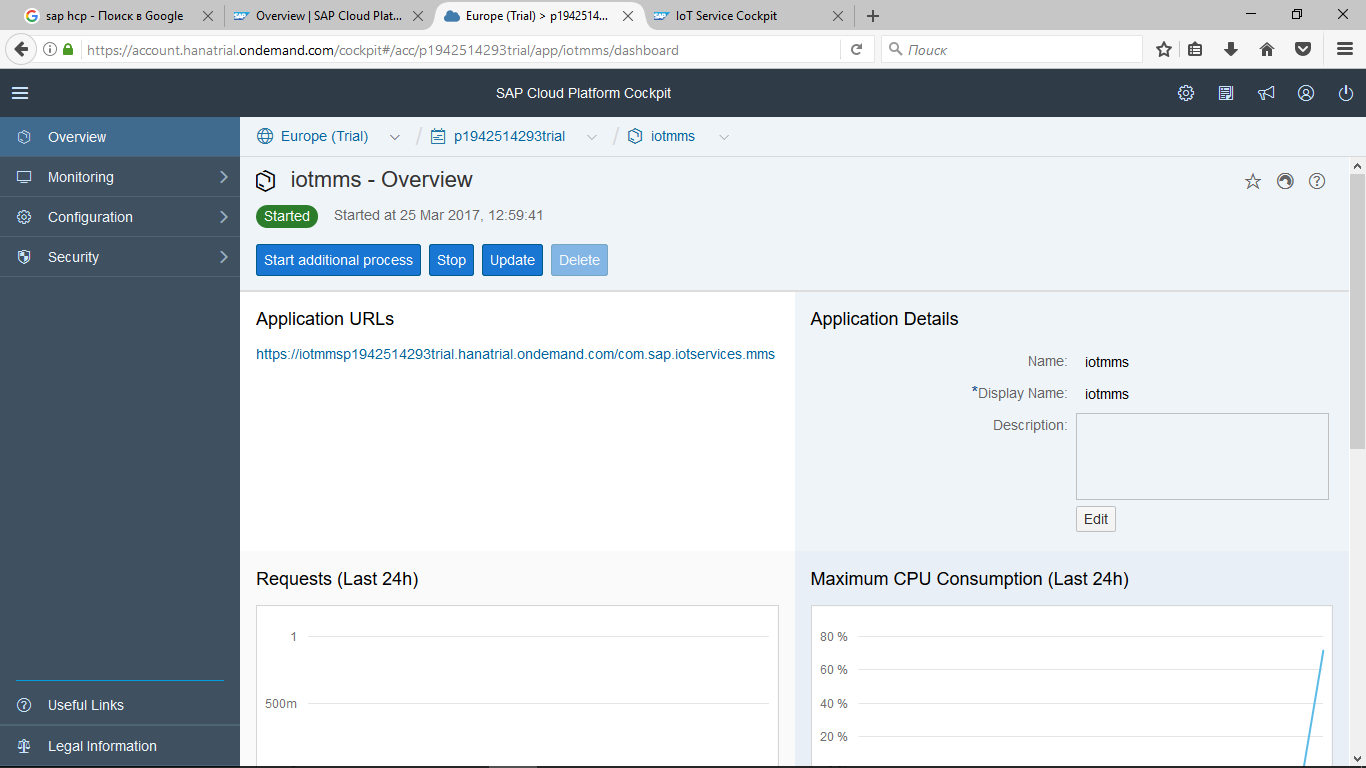
Yous can enter the application and see how it can be controlled: stop, prepare access rights, cheque its operation and exam performance. Almost of the settings in our example are not required. We will do only one thing - we will bind the service to our database. By default, the application writes all information to its own database schema.
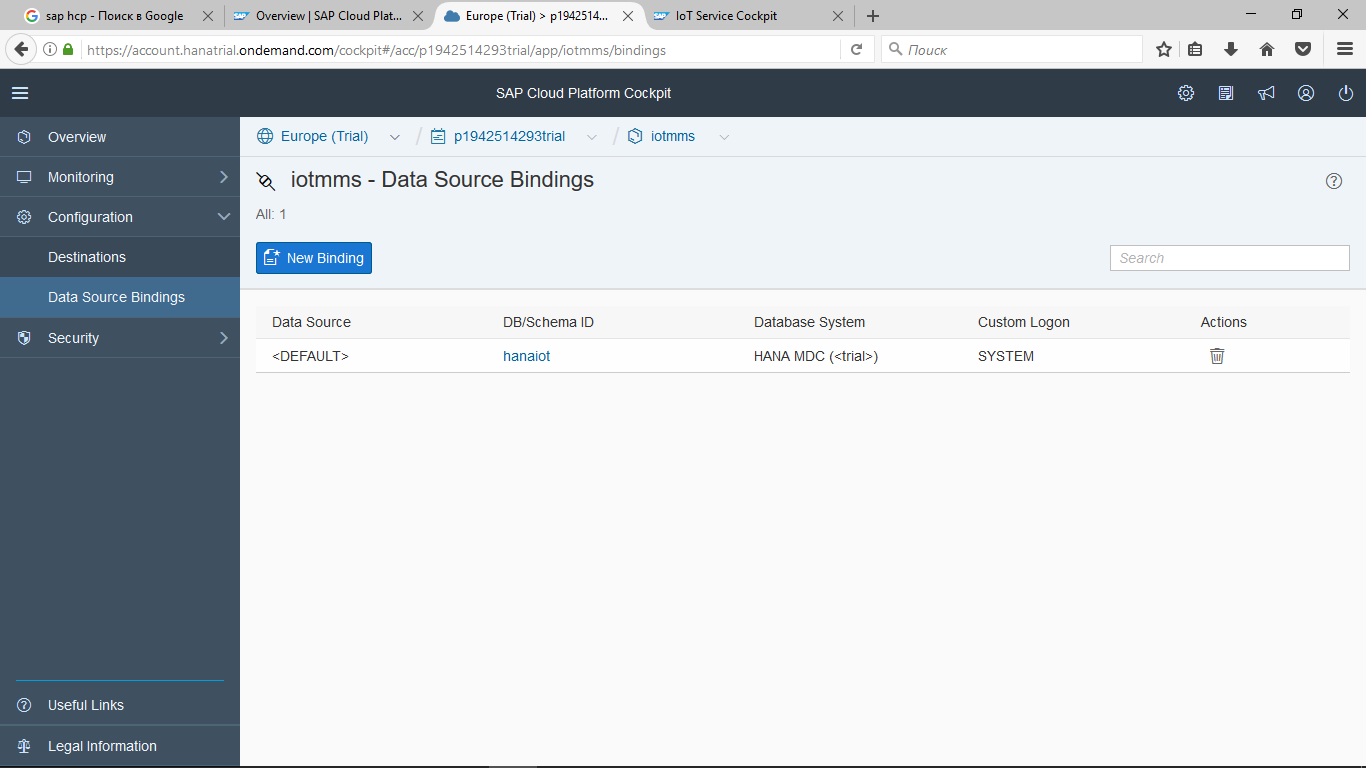
Go to the Configuration → Data Source Binding section in the left toolbar. Delete the default data binding by clicking the Delete push.

Click the New Binding button. The system itself volition offer to bind the service to our database. Yous only demand to enter the data for the connexion: login - SYSTEM (or the name of your user, if you made it earlier) and countersign. Next, relieve the entered parameters by clicking the Save push button.

The default schema is replaced by our own.
Another important setting is to issue admission rights to the IoT application. Nosotros demand to allow our user to piece of work with the created iotmms plan. Get to the Security → Roles tab.
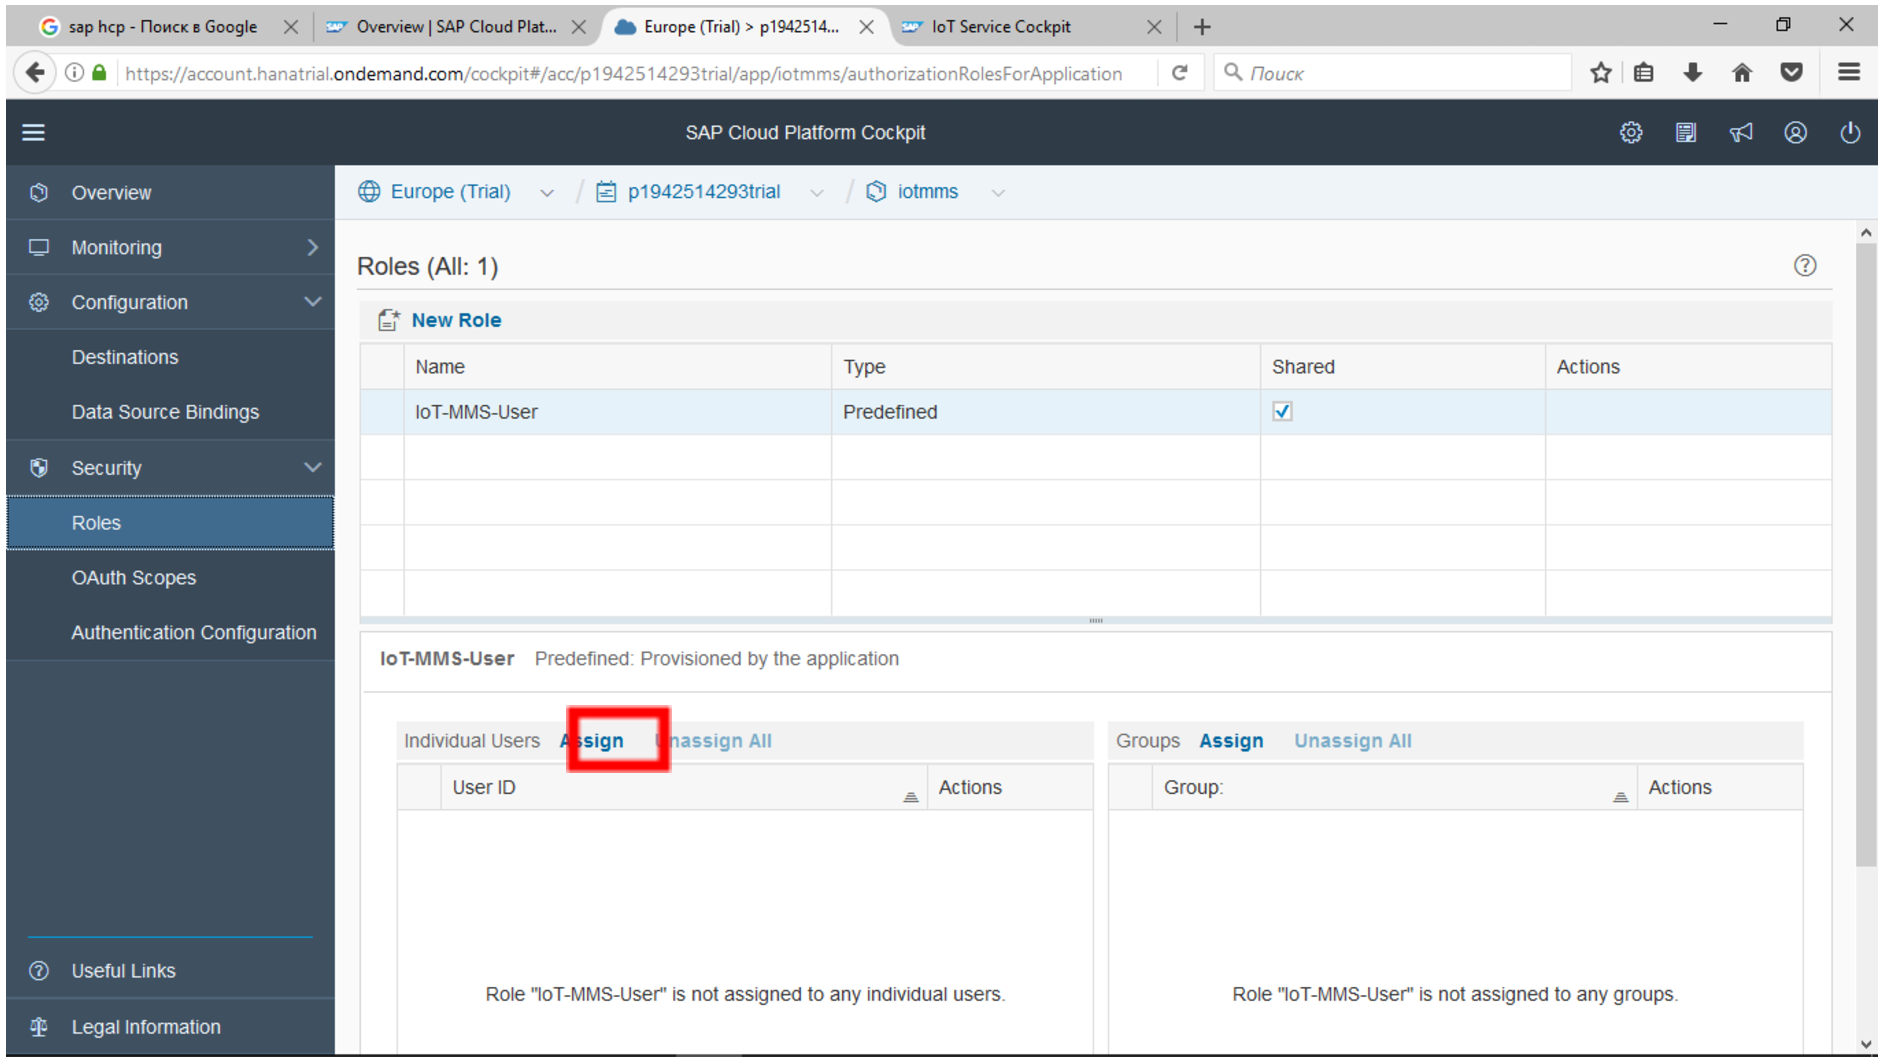
It can be seen that there is already a role that allows y'all to work with this program - IoT-MMS_User. It must be added to our user. Click the Assign button in the lower left tabular array and enter the User ID.

You can find the username in the Account section of the SAP Deject Platform setup or in the address bar of the browser.

In social club for all of our settings to take event and earn binding to the new database, y'all need to restart the iotmms service. To do this, go to the iotmms settings and click "Stop", and so - "Start". The new settings will take upshot and the data will be written to our database.
We render to the Services section. Here you demand to select the Internet of Things service and starting time the get to Service setup. We will check its work.

Step 4. Testing the IoT service and sending a test message to the SAP Cloud Platform
Go to the Ship Message department.

Here nosotros can see the messages transmitted from the device or test the manual.

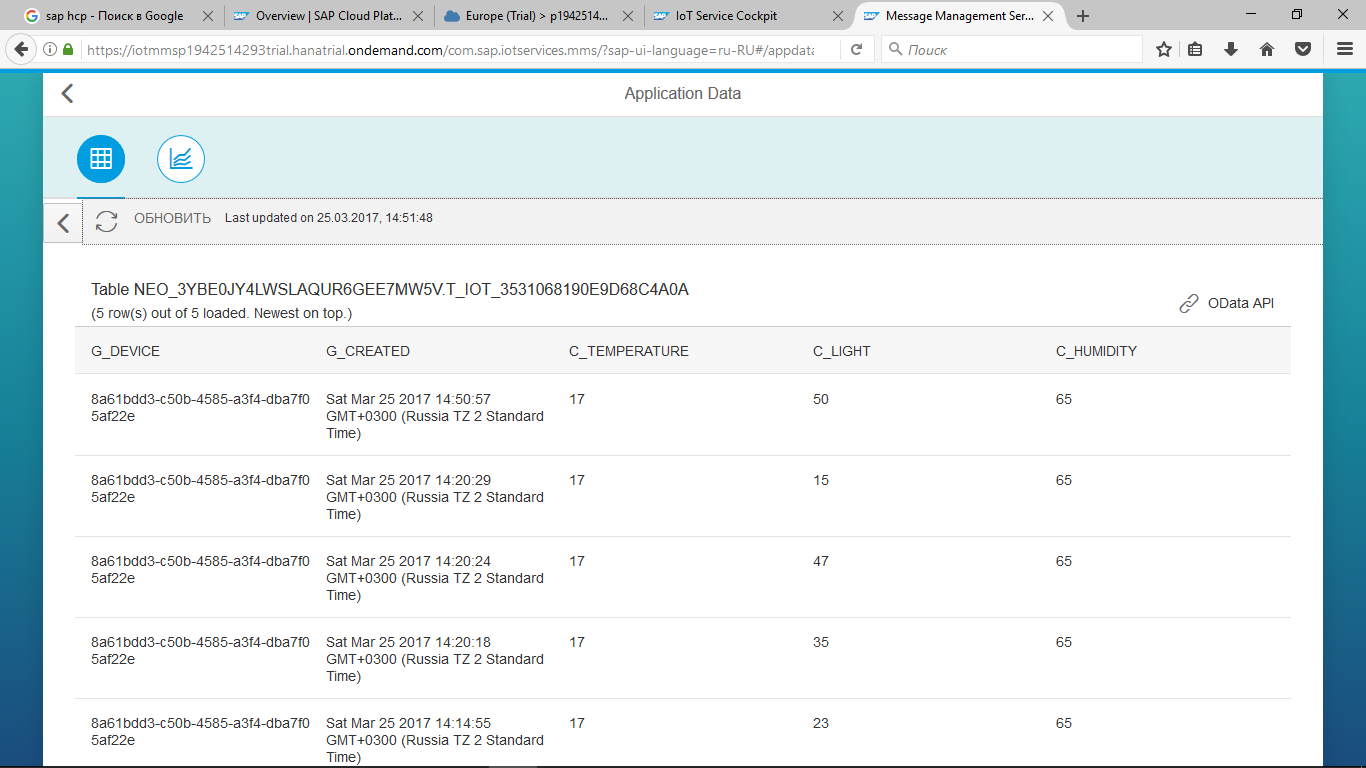
Let's become to the Display stored bulletin section.

Here y'all will see two technical tables, from the data from which you lot tin can always find out the status of continued devices: whether it works or not, when the data was terminal transmitted and much more. You can see what data is stored in these tables past simply clicking on them.

But at that place are no tables with our data on temperature, humidity, light level still. It volition exist created automatically every bit soon every bit the first data is transferred from the sensor to the SAP Cloud Platform.
Allow's effort to send the first bulletin from the device. For now, nosotros volition test the operation of the service without physically connecting the microcontroller. The bulletin will exist transmitted as an HTTP request, which we will generate in the control panel. Merely start, recall the previously saved parameters:
ID Bulletin Type = 3531068190e9d68c4a0a ID экземпляра устройства = 8a61bdd3-c50b-4585-a3f4-dba7f05af22e Token = e0b0dc97cc4913311a17cfcdb3f9321e Go to the Transport and receive massage through HTTP section.

In that location is a special tool for emulating the manual of letters from sensors.

It is an ordinary Balance API customer for generating an HTTP request to a remote service. You tin too use any other tool convenient for you. Selection with Google Chrome extension I will testify later.
We add the correct identifiers of our devices and slightly alter the format of the transmitted message, according to our setting.

In the HTTP endpoint section, you need to replace the device access with our own (previously saved) device case ID. Then the system will be able to sympathize that the signal comes from the sensor with the desired number.
iotmmsp1942514293trial.hanatrial.ondemand.com/com.sap.iotservices.mms/v1/api/http/data/8a61bdd3-c50b-4585-a3f4-dba7f05af22e
In the Message to Mail section, insert our Message ID and add the fields:
{"mode ":" Sync "," messageType ":" 3531068190e9d68c4a0a "," messages ": [{" Temperature ": 17," Calorie-free ": 23," Humidity ": 65}]} The
bulletin ID and instance ID are highlighted in ruddy font devices. Nosotros don't need token yet. Since this is an internal testing tool, the system ignores security settings. Simply if we effort to do this from a third-party application, the arrangement volition not allow y'all to log in without token, i.e. no password.
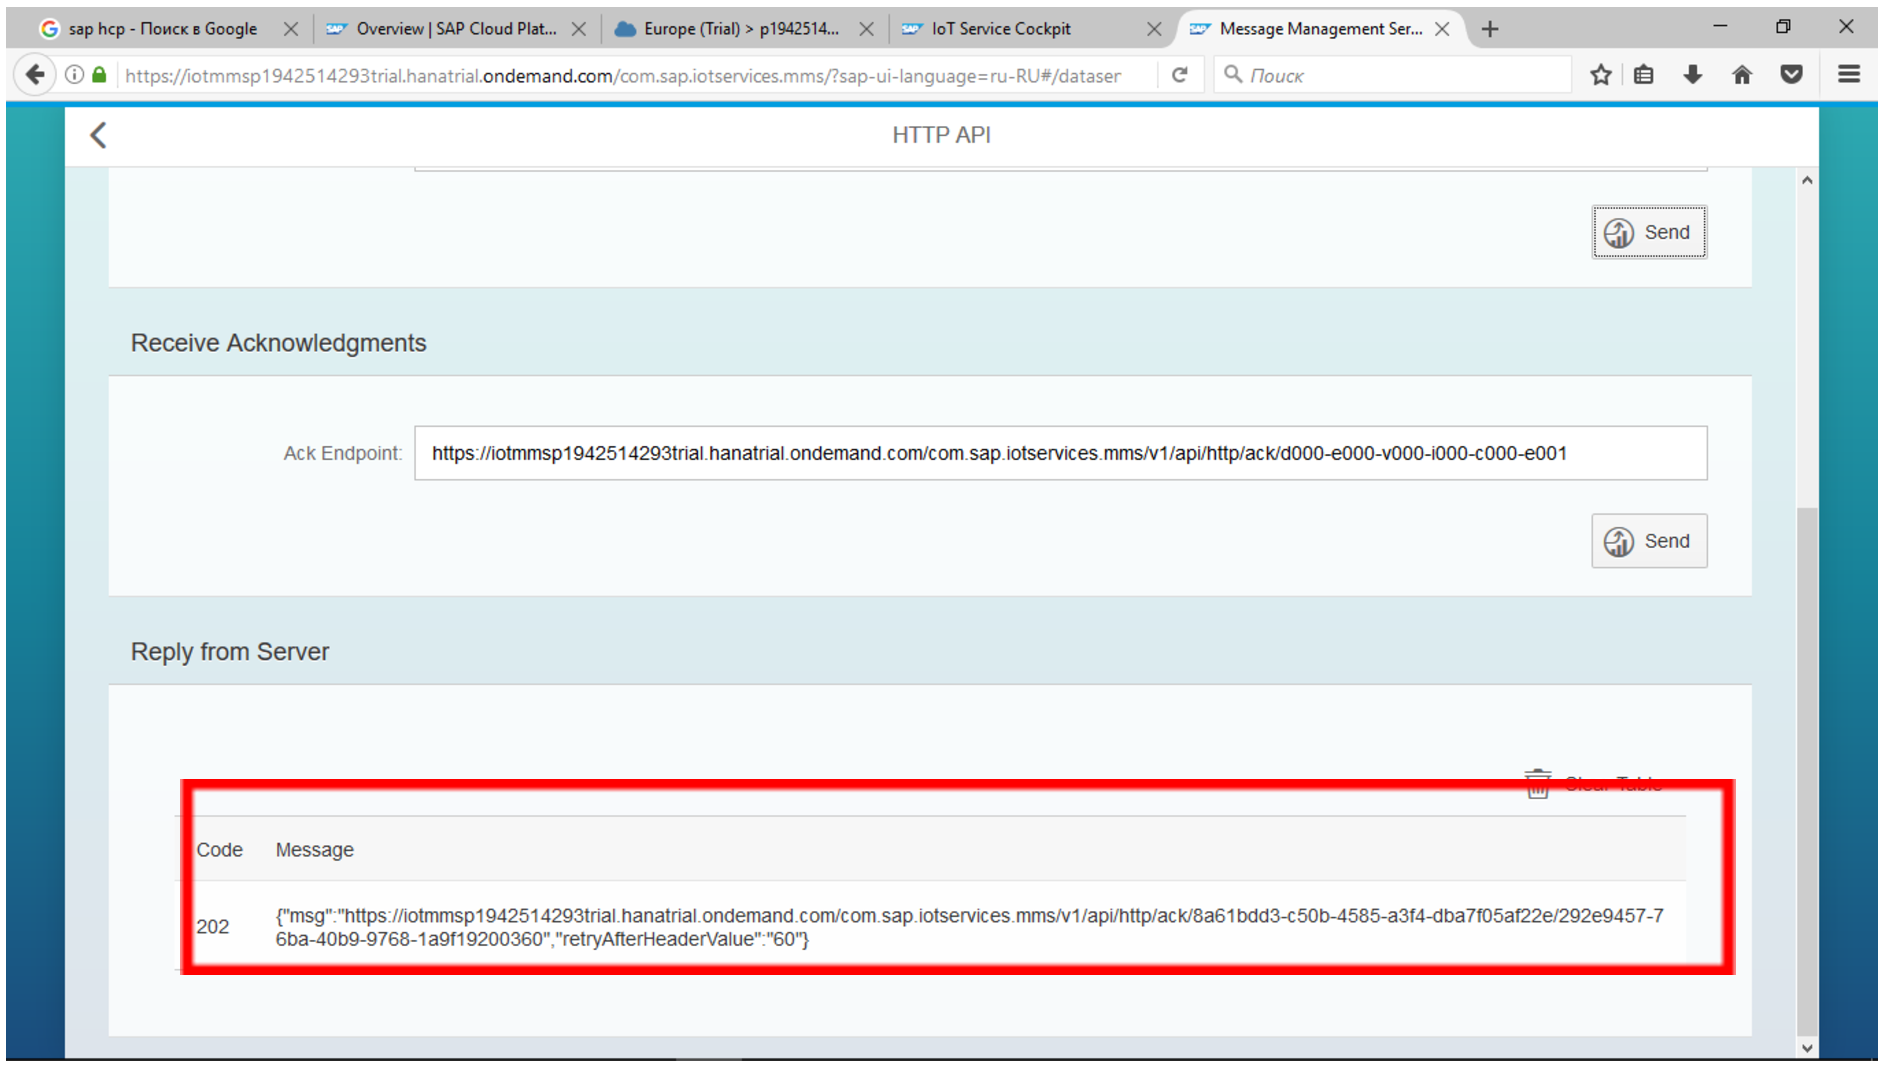
Now everything is set and you lot can click the Post button. Your first message was sent to the SAP Deject Platform! You can check this in the Answer from Service section. If something is wrong, the fault lawmaking returned by the remote IoT service will be shown hither. By the code y'all can understand what happened.
At present go dorsum to the Send and view message section and select Brandish Stored Letters.

Hither y'all will encounter two more than tables that were created automatically as soon equally we transferred the data to the arrangement.

Look at the contents of the tabular array and make sure that this is exactly the data that you lot passed for the exam.

Attempt changing test data for temperature or calorie-free level and transfer the data again. In our example, we changed the lite level parameter several times.

Having entered the table, we see that the IoT service is ready to receive data from sensors.

All your entries have been saved automatically. And by choosing the icon for displaying data in graphical class and your information type + instance, you lot will run into them in the form of a graph.

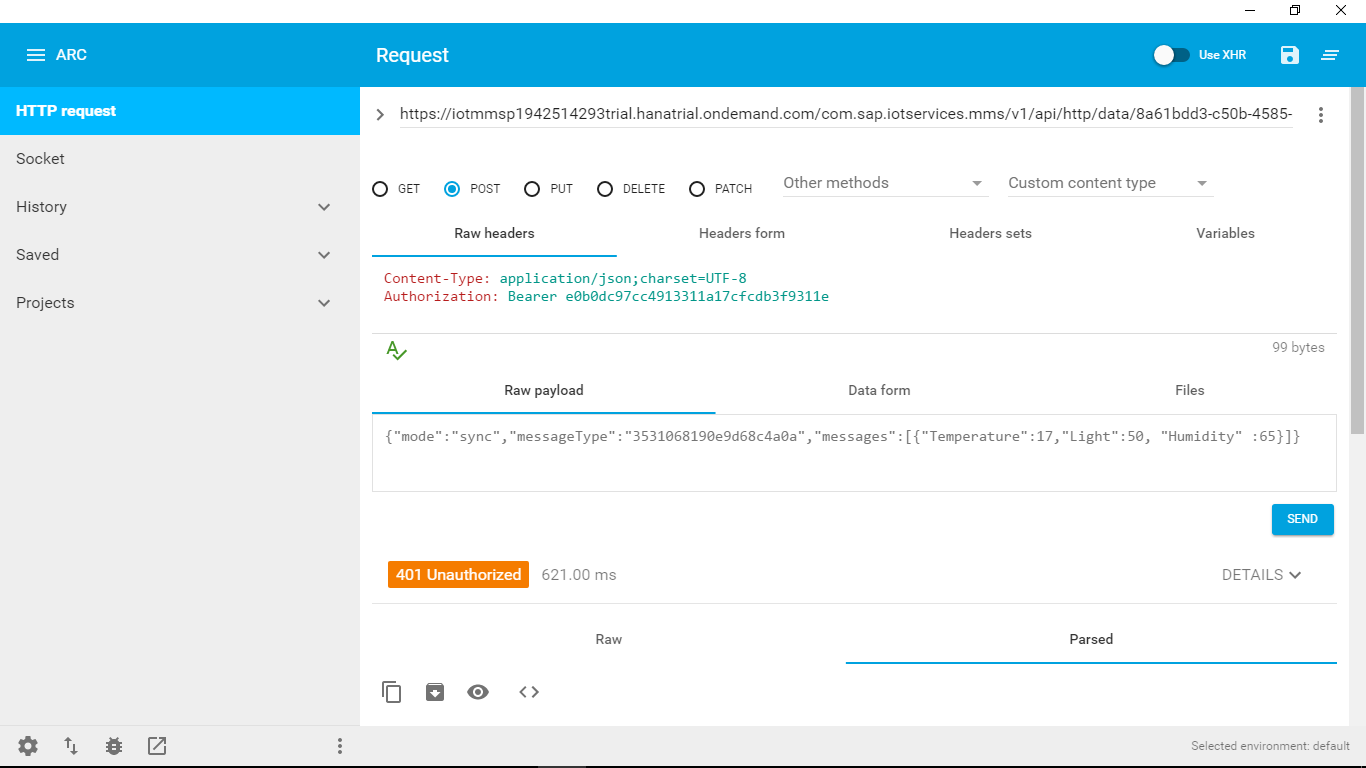
Footstep 5. Testing the IoT service using the Advanced Residuum Customer extension in the Google Chrome browser
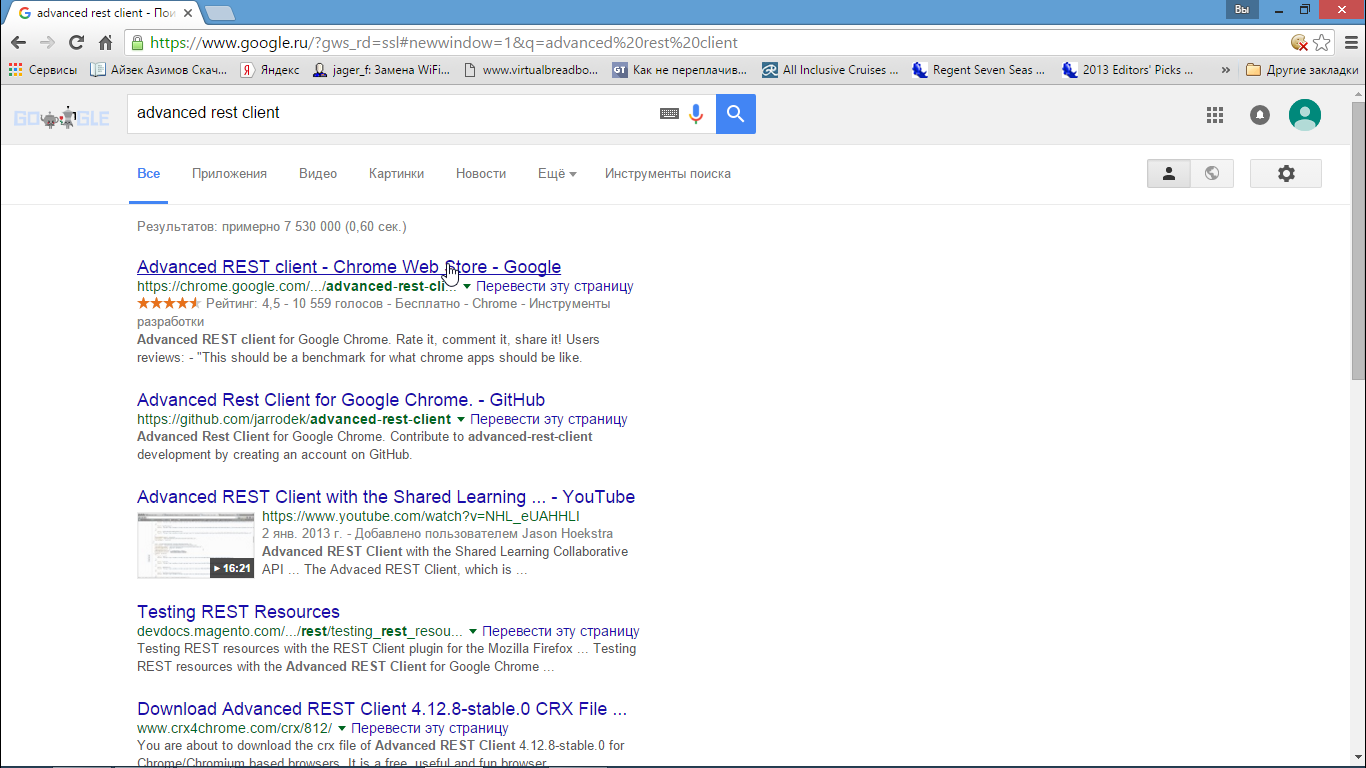
And at present let'southward examination our service with all the security requirements. To exercise this, we need the Google Chrome browser. Install a browser. Run it. In the search bar, enter avant-garde rest client.
This is a special Google Chrome browser extension for developers. It helps you exam HTTP requests without the need to develop your own programs.
Install the application (the starting time link in the search results) by clicking the Add together to Chrome push button.

And beginning by clicking ARC in the list of services.
Y'all need to construct a call to the Mail service method by setting the necessary parameters, equally you already did, testing the service using the SAP Deject Platform tools. The only difference is that you need to take care of passing the token secret code in the header of the POST request.
In the URL header, enter a like line with the device ID:
iotmms p1942514293trial.hanatrial.ondemand.com/com.sap.iotservices.mms/v1/api/http/data/8a61bdd3-c50b-4585-a3f4-dba7f05af22e
In the bulletin body, pass the parameter value :
{"Fashion": "sync", "messageType": " 3531068190e9d68c4a0a ", "messages": [{"Temperature": 17, "Light": 23, "Humidity": 65}]}
We did not fill out the Headers header, and it should be of the specified format:
Content-Type: application / json; charset = UTF-eight
Authorisation: Bearer e0b0dc97cc4913311a17cfcdb3f9321e
Where the cerise text marks the parameters that need to be inverse (including token) to those that we wrote down earlier. The result should be the following picture:

By clicking Send, you will meet a response from the server and you can see the transmitted record.
Try an experiment. Remove the line
Authorisation: Bearer 58536ee037cf158db4992d5538b8d5b0
The server does not pass such a asking, responds with an authorization mistake 401. Thus, we insure against connecting unauthorized devices.
This is just one example of how the SAP Cloud Platform security system works. In industrial programs, security is taken even more seriously and uses various methods (not only token authentication) to protect programs and industrial systems.
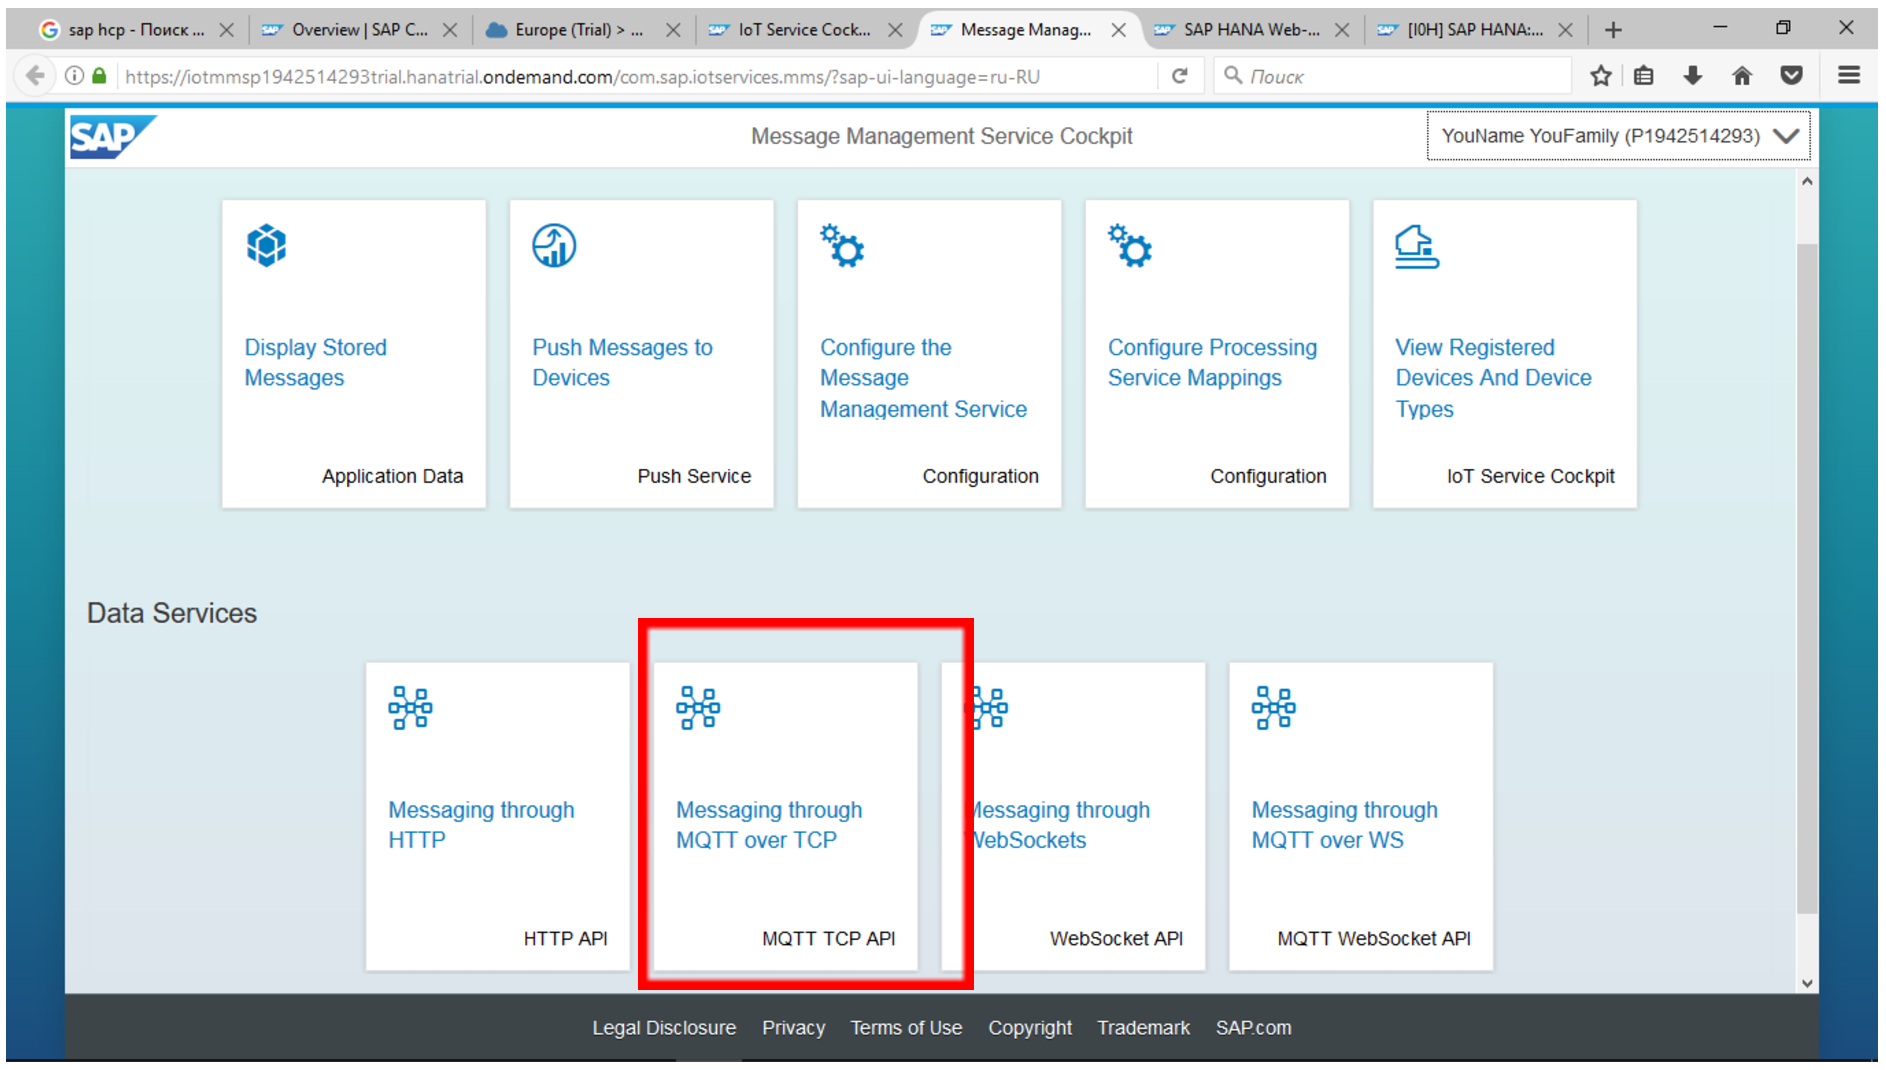
Alternative: nosotros configure the operation of the IoT service using the MQTT protocol
If y'all carefully studied the awarding for testing the IoT service, you might find another pick for working with data - through the MQTT protocol.
MQTT (Message Queuing Telemetry Transport) is a simple open protocol designed specifically for IoT and used to exchange information between devices. The MQTT network includes an MQTT broker, which serves every bit an intermediary in the interaction of MQTT agents - publishers and subscribers. Publishers publish information intended for subscribers.

MQTT Broker, Publisher, and Subscriber
MQTT is designed for low-ability embedded devices, then the computing requirements for its implementation are minimal. The protocol is highly efficient even on low bandwidth channels. In the construction of the information transmitted with its help, there is very little overhead information. According to measurements fabricated in 3G networks, the MQTT bandwidth is 93 times higher than the Representational State Transfer (Balance) protocol, which runs on pinnacle of HTTP.
MQTT uses a limited gear up of commands, all of which come downwardly to interacting with a broker and working with topics and messages. Agents connect to the broker, and and then either publish topics and messages in them, or subscribe to topics and receive messages published in these topics. Upon completion, the agents disconnect from the banker.
Y'all tin can read more near the principles of operation of the MQTT protocol in diverse articles on the Internet, including on Habrahabr. For example here .
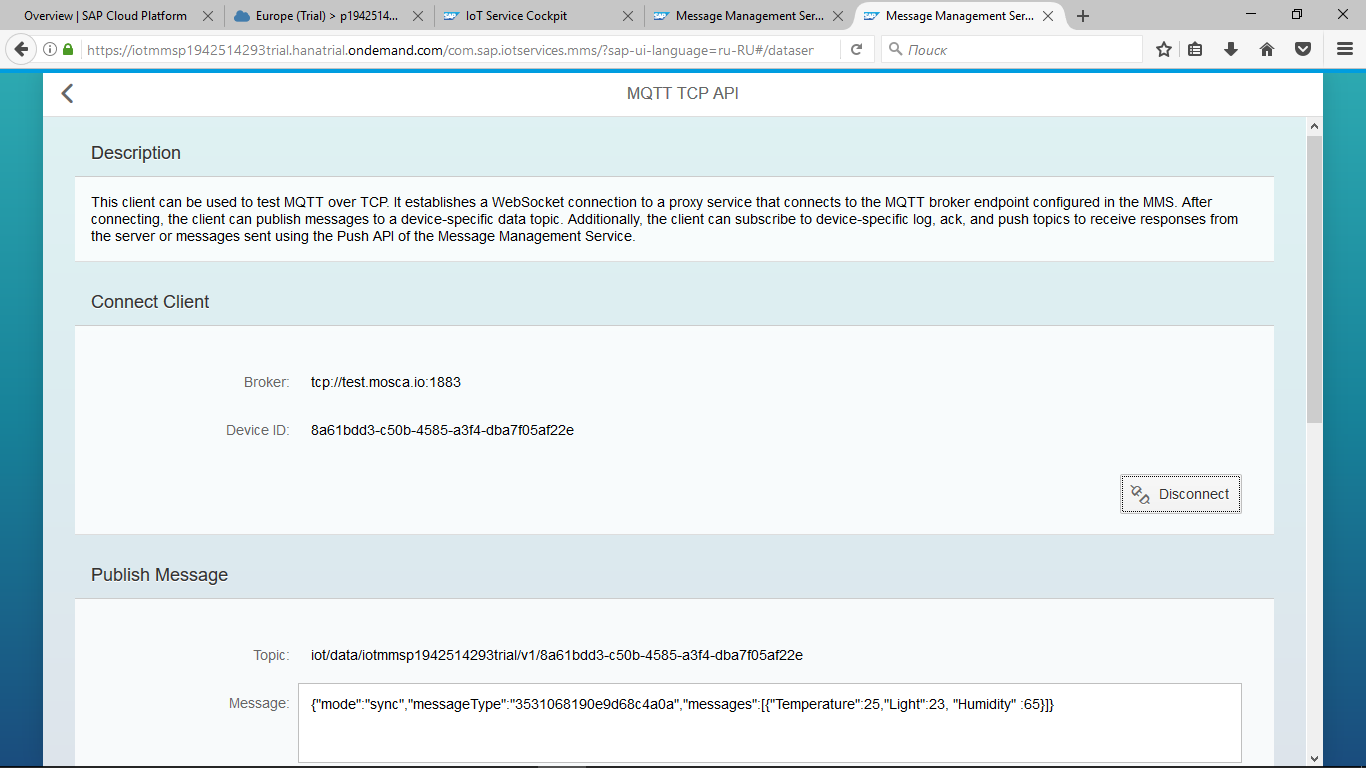
In guild to start working with the MQTT protocol, we need to choose a broker through whom we will substitution data between devices and the SAP Cloud Platform. At that place are many costless MQTT brokers, you tin also set up your ain banker. In our case, we will use the MQTT banker test.mosca.io. This broker is configured on port 1883 and does non crave a username or password to piece of work.
Let'south configure our IoT service to work with this MQTT broker.

Select Configure the Message Direction Service.
In the Data section, enter the settings of your MQTT broker:
tcp://exam.mosca.io:1883 
If your MQTT broker uses a username and password for authorization, this data must also be entered in the service settings. In our example, for the user and password, enter: test \ test
Later saving the data, go to the Messaging through MQTT over TCP section.


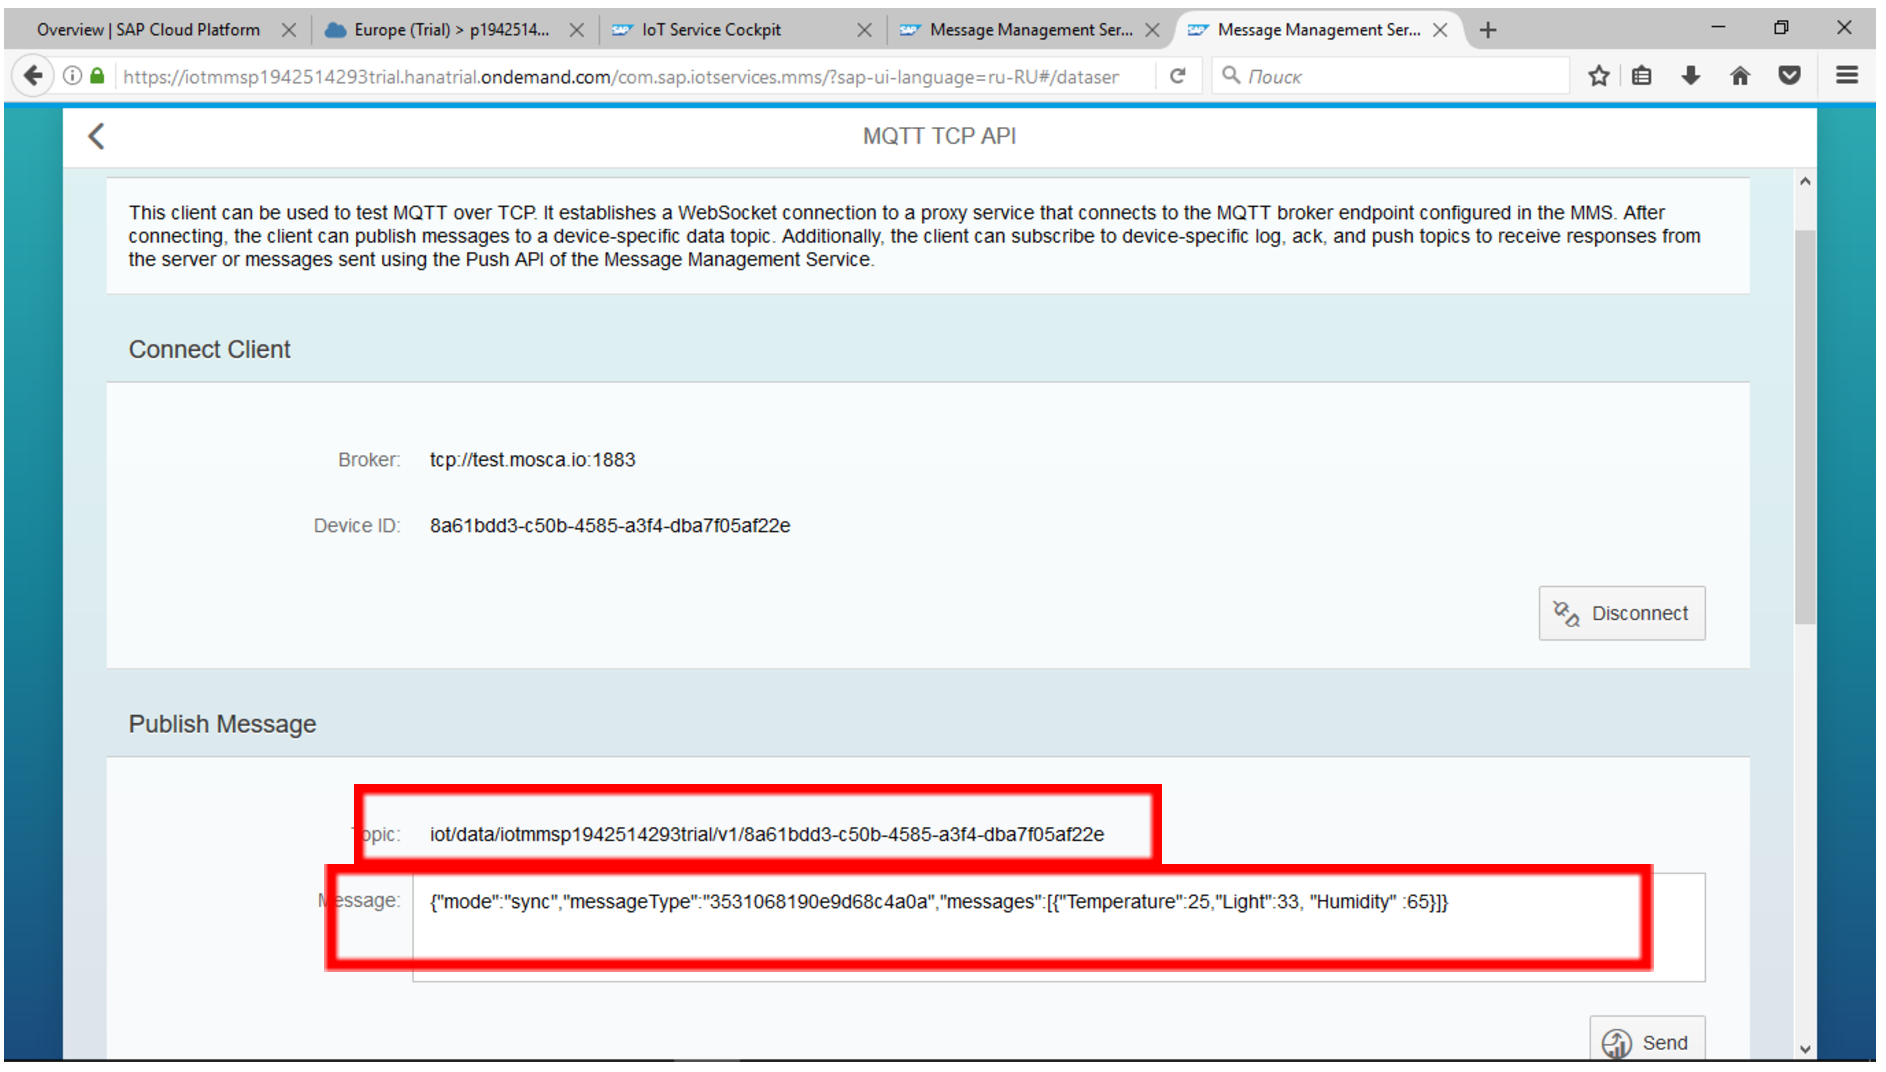
Enter your information in the Device ID section: 8a61bdd3-c50b-4585-a3f4-dba7f05af22e
In the Message field:
{"way": "sync", "messageType": " 3531068190e9d68c4a0a ", "messages": [{"Temperature": 25, "Calorie-free": 23, "Humidity": 65}]}
And click the "Connect" push button to connect to the broker.
Try sending the message by clicking Ship on the form.
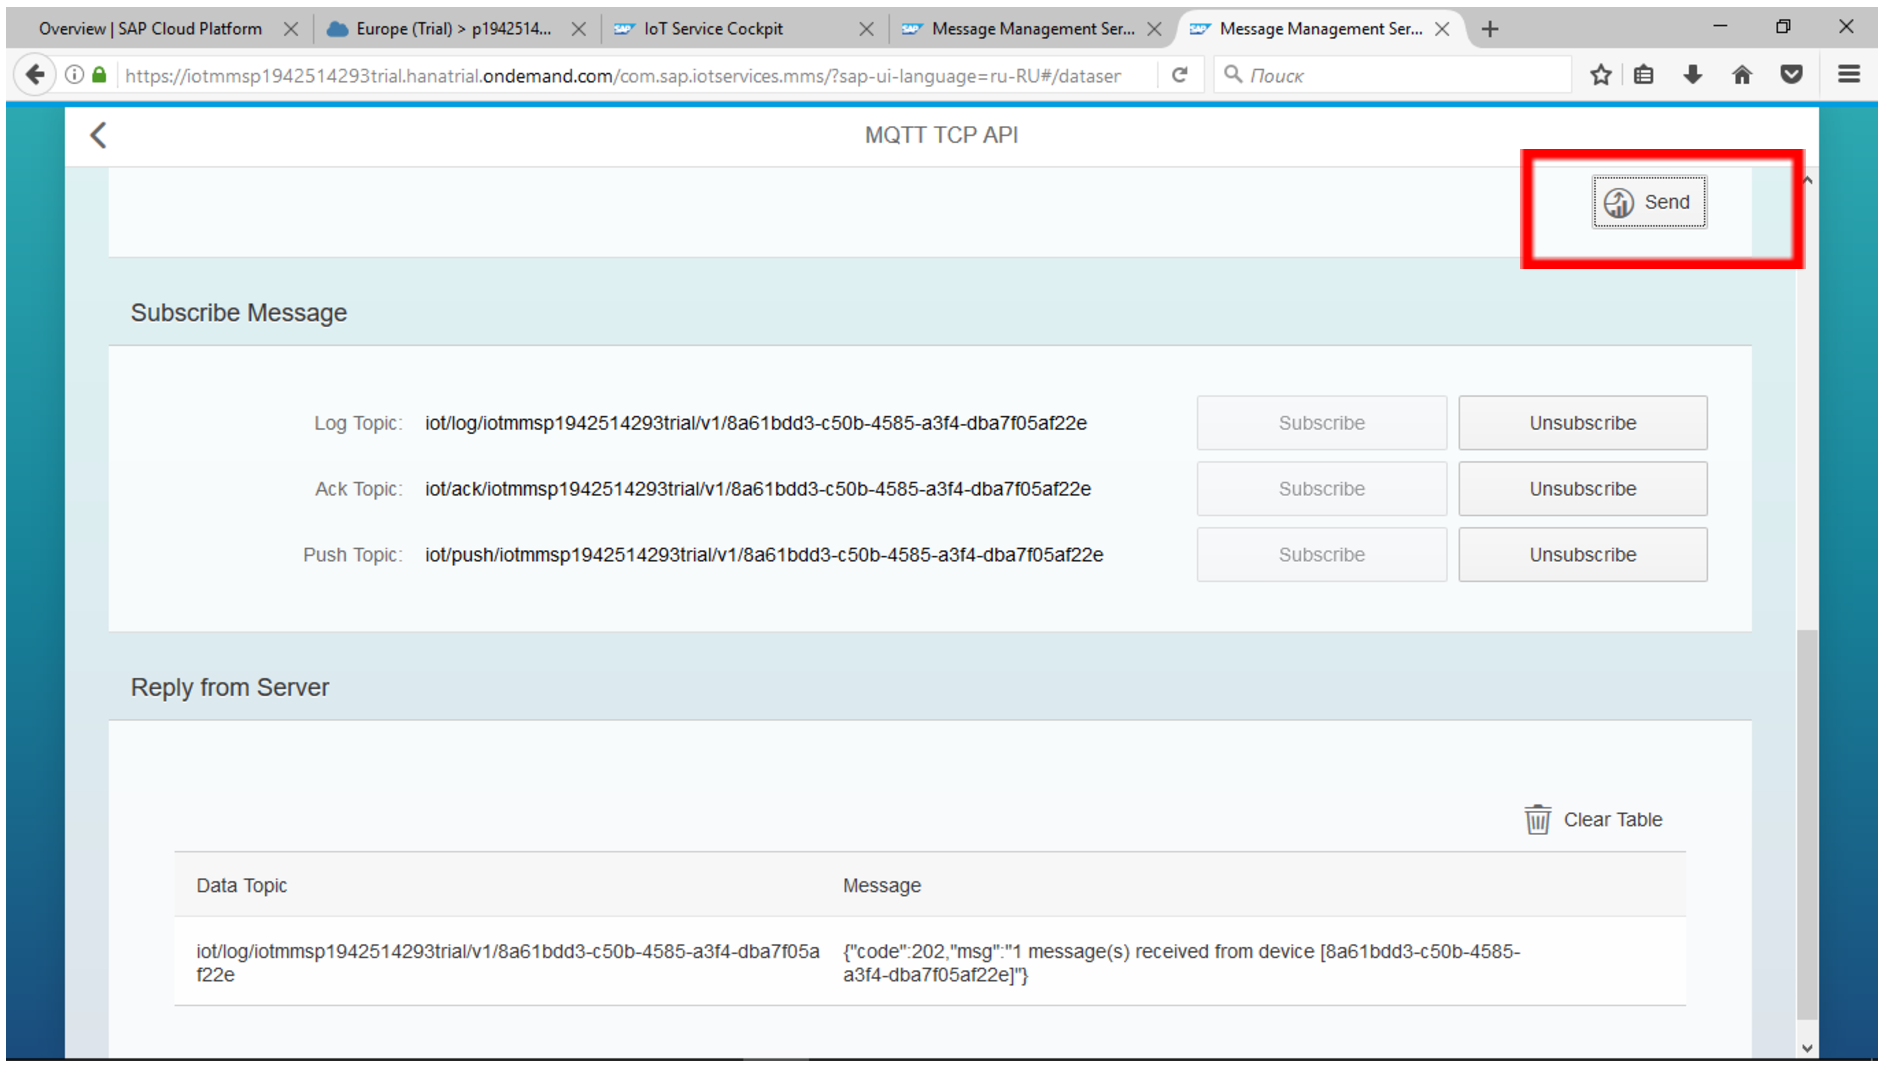
Verify that your message has been transferred to the IoT table through the MQTT broker.

You can try to transfer the message to the SAP Deject Platform through a third-political party MQTT client. For example, through MQTT FX .
Install the program and configure the connection to your MQTT broker.
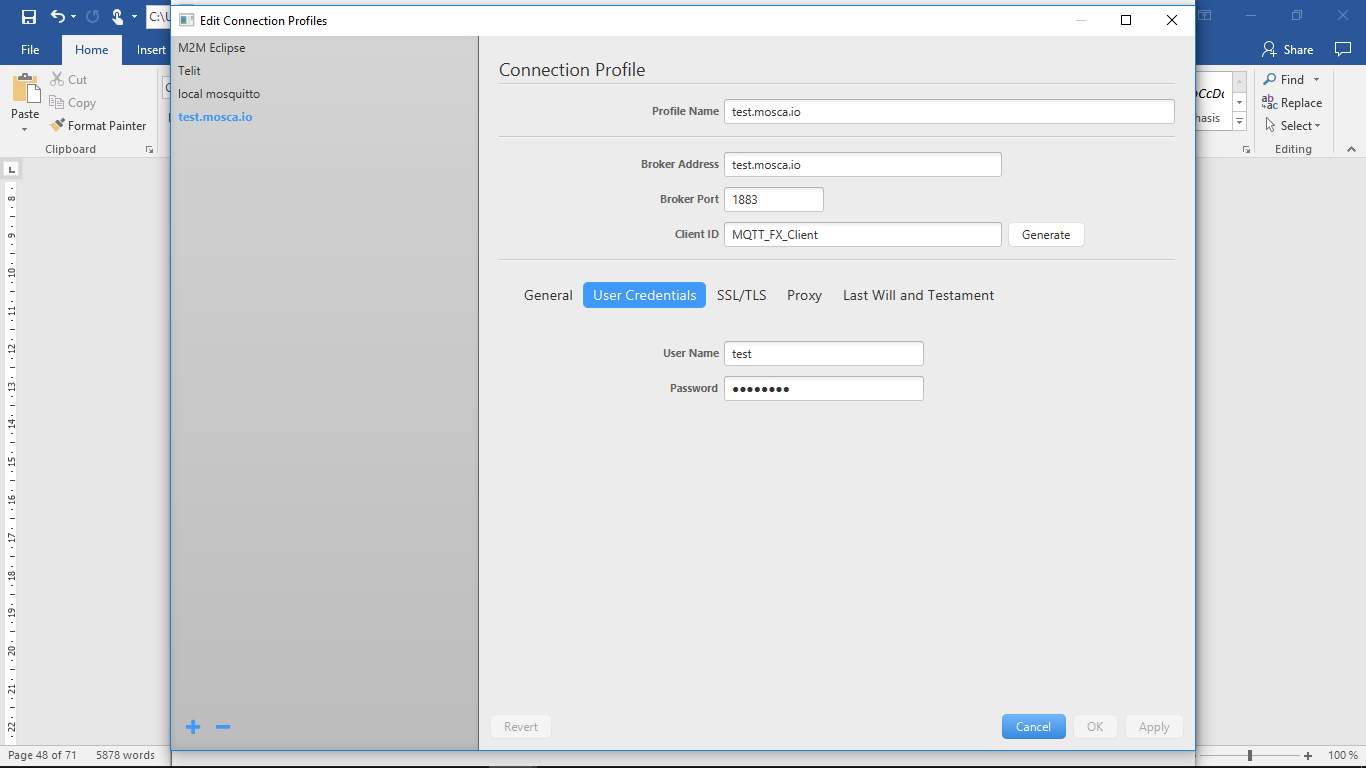
Click Connect and on the Subscribe tab subscribe to the topic that you saw in the IoT service settings:
iot/data/iotmmsp1942514293trial/v1/8a61bdd3-c50b-4585-a3f4-dba7f05af22e 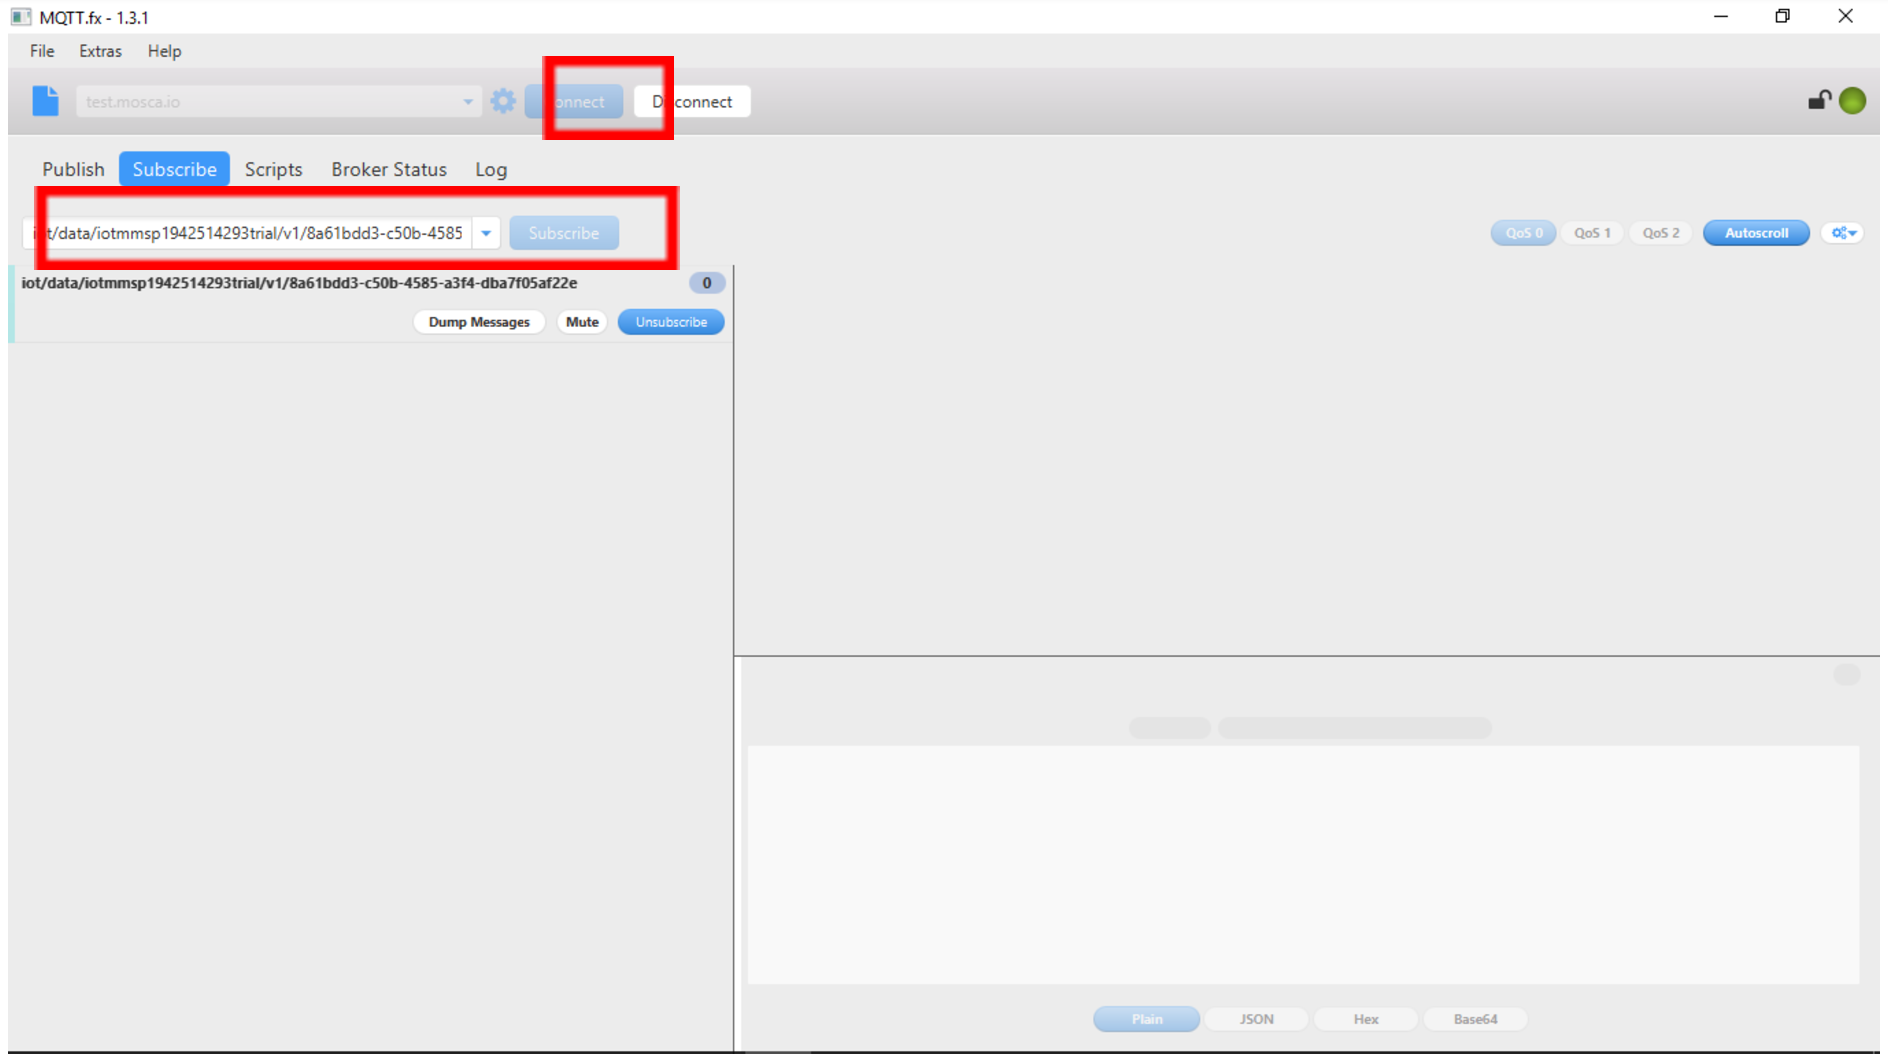
On the Publish tab, you can transport letters with the appropriate topic through a broker to the configured IoT service.

Try passing a few values and brand certain that data reception is successful.
Step half-dozen. Cooking the Iron at Arduino
In this section, we volition connect a real controller and sensors to the platform. The microcontroller Arduino Yun will act as a control device. Arduino is a very convenient platform for the rapid development of electronic devices for beginners and professionals.

Arduino Yun is convenient in that, in addition to the Atmel ATmega32U4 main microcontroller, it has an additional Atheros AR9331 processor running Linux with the OpenWrt wireless stack. This is a suitable device for our project, as information technology carries Linux "on board" and allows you to connect via HTTPS to remote services, including the SAP Deject Platform.
Before starting work, we demand to put the evolution environment for the Arduino programs, make the initial setup of the microcontroller and connect it to the network (wired or WiFi).
As sensors and controls for our Arduino nosotros will use:
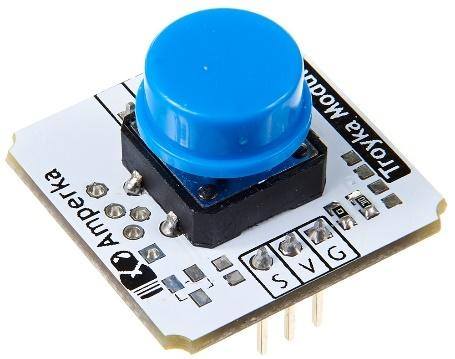
1) Push button .
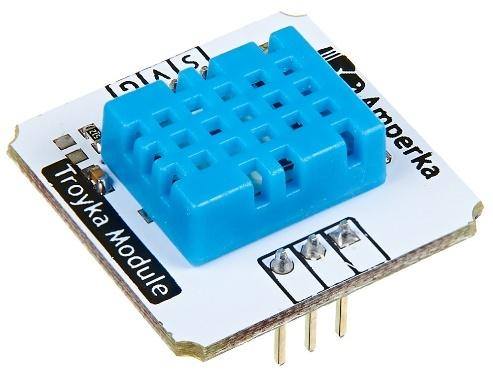
2) Digital temperature and humidity sensor .
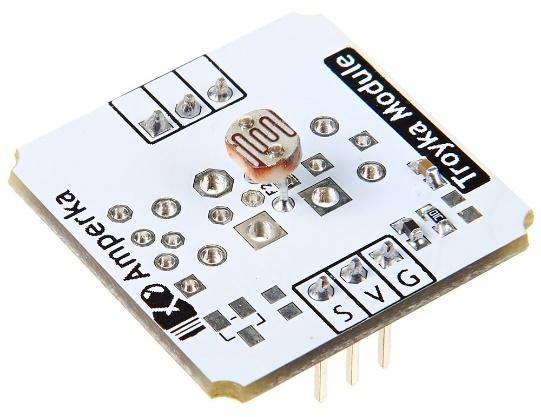
3) Light sensor .
iv) LED .

Instead of the indicated sensors, y'all tin use whatever others past making advisable changes to the control program.
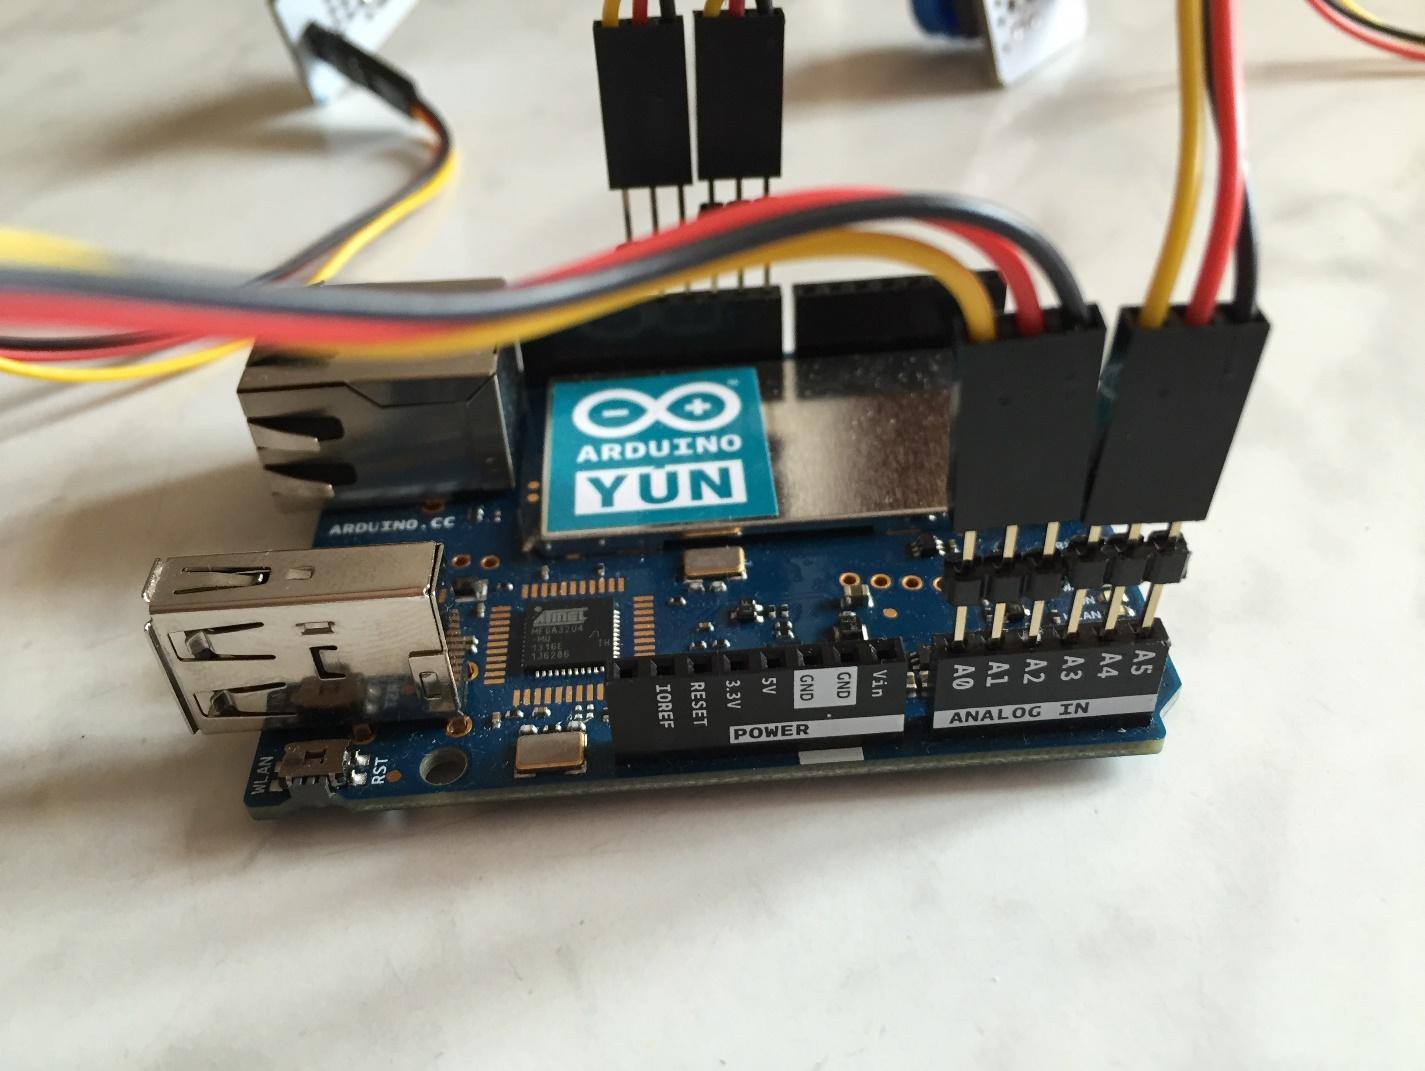
Each sensor has three contacts - S, 5, Yard.
Connect the sensors co-ordinate to the diagram.
Button connectedness:
8 pin (V - power, reddish)
9 pin (Thousand - basis, blackness)
x pin (Southward - signal, yellowish)
LED connectedness:
11 pin (V - ability, red)
12 contact (G - basis, blackness)
thirteen contact (S - signal, xanthous)
Connecting a photodiode:
A0 contact (S - betoken, yellow)
A1 contact (Five - power, red)
A2 contact (G - ground, black)
Sensor connection temperature:
A3 contact (S - indicate, yellow)
A4 contact (5 - power, ruby-red)
A5 contact (G - ground, blackness)

Step 7. Nosotros organize data transfer from Arduino to the cloud via HTTP
Let's configure data transfer to the SAP Cloud Platform by calling a Post asking via HTTP. When a button is pressed, information on the level of illumination, humidity and temperature will exist transmitted to the SAP Cloud Platform system.
The peculiarity of the work of this program is that the SAP Cloud Platform in the trial version requires the mandatory organisation of a secure connection using the HTTPS protocol, which cannot be done in regular versions of Arduino. Therefore, we take to utilise the version of Arduino Yun with integrated Linux. The easiest way to do this is with the CURL utility, which is implemented in the script beneath.
Для отладки и проверки скрипта я рекомендую попробовать работу утилиты CURL, напрямую подключившись к Arduino Yun в терминальном режиме через Putty. Для этого вам потребуется скачать с сайта Putty.org утилиту, с помощью которой можно подключаться к микроконтроллеру. Или напрямую воспользоваться терминалом, если вы работаете в Linux среде.

Внесите IP-адрес в утилиту в поле Host Name or IP

Внесите IP-адрес в утилиту в поле Host Name or IP
Тип подключения SSH. Нажмите Open.
В терминальном режиме наберите имя пользователя root.
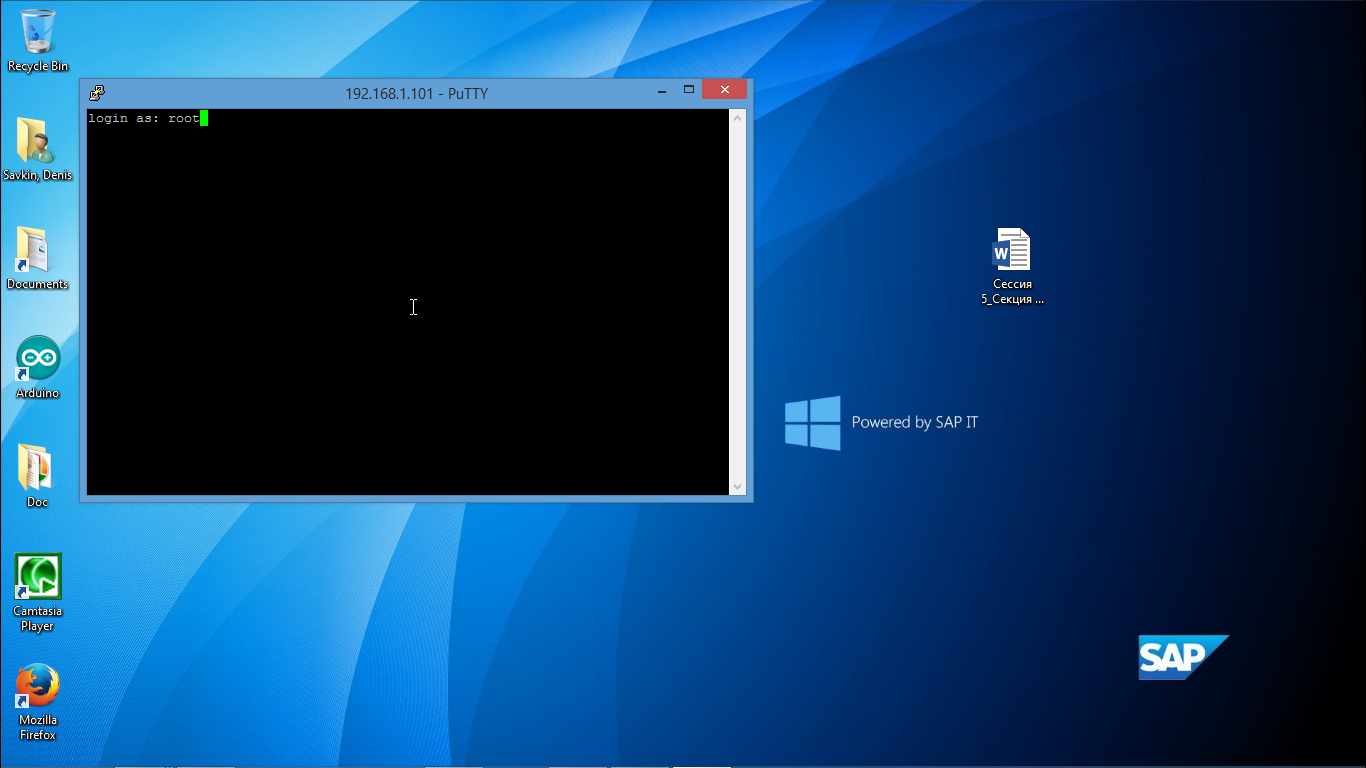
И пароль, который вы задавали в настройках соединения с Arduino.
Система подключена и готова выполнять команды.

Адаптируйте команду gyre, согласно вашим данным:
curl --header «Authorization: Bearer e0b0dc97cc4913311a17cfcdb3f9321e» --header «Content-Type:application/json;charset=UTF-eight» -k -X Postal service iotmmsp1942514293trial.hanatrial.ondemand.com/com.sap.iotservices.mms/v1/api/http/information/8a61bdd3-c50b-4585-a3f4-dba7f05af22e --information ''{''mode'':''async'',''messageType'':''3531068190e9d68c4a0a'',''letters'':[{''Temperature'':23, ''Light'':21, ''Humidity'':65}]}''
Фрагменты, выделенные красным, надо изменить в соответствии с вашими параметрами. Скопируйте готовый текст. В терминале нажмите правую кнопку мыши. Текст скопируется.
Нажмите Enter.

Если все параметры указаны верно и настройки Arduino Yun выполнены корректно, то сервер SAP Cloud Platform вернет подтверждение о сохранении записи сервисом IoT: ane bulletin received from device.
Теперь можно загрузить скетч и адаптировать его, согласно вашим данным настройки IoT-сервиса в SAP Cloud Platform (выделено красным).
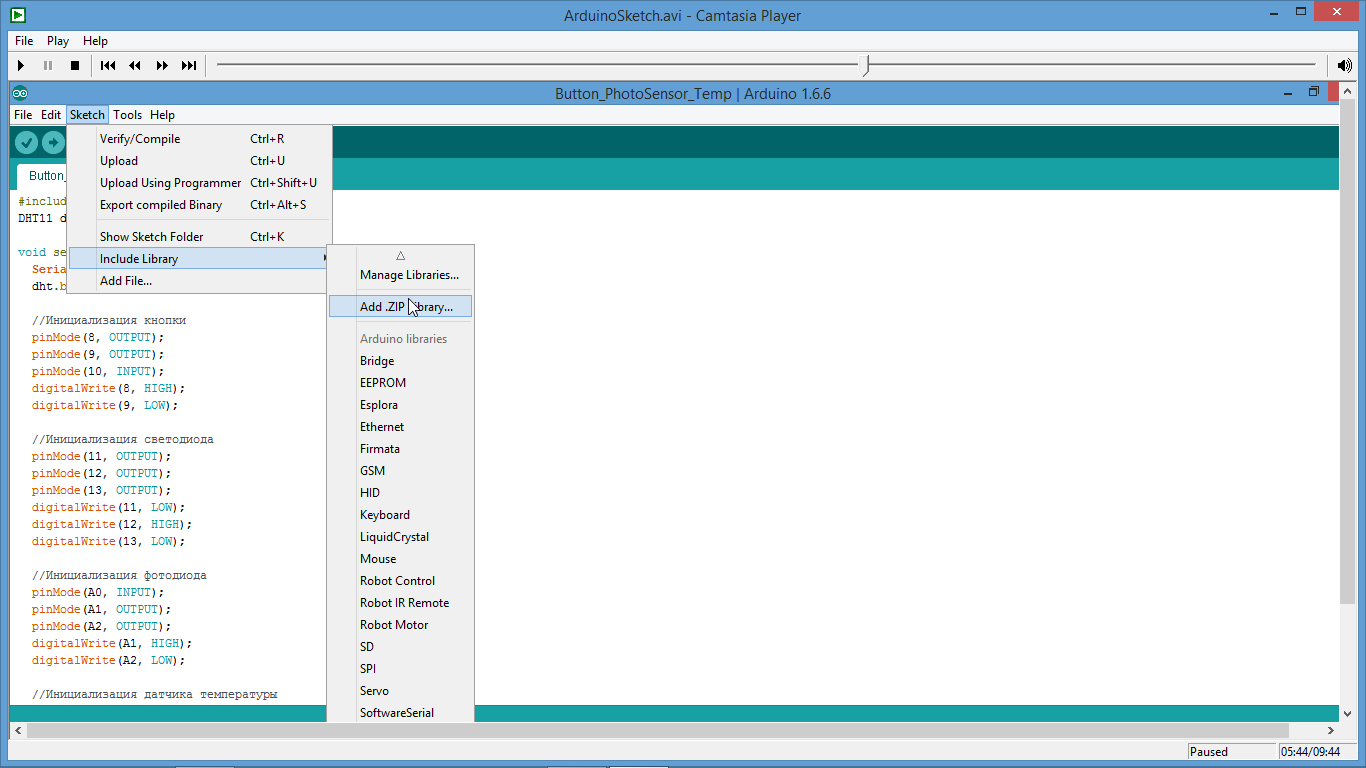
#include #include // Инициализация переменных DHT11 dht(A3); int cheque; int Light_v; int Temp_v; int Humidity_v; void setup() { Span.begin(); Serial.brainstorm(9600); dht.brainstorm(); //Инициализация кнопки pinMode(viii, OUTPUT); pinMode(9, OUTPUT); pinMode(10, INPUT); digitalWrite(8, HIGH); digitalWrite(ix, Low); //Инициализация светодиода pinMode(11, OUTPUT); pinMode(12, OUTPUT); pinMode(13, OUTPUT); digitalWrite(11, LOW); digitalWrite(12, HIGH); digitalWrite(13, Depression); //Инициализация фотодиода pinMode(A0, INPUT); pinMode(A1, OUTPUT); pinMode(A2, OUTPUT); digitalWrite(A1, HIGH); digitalWrite(A2, LOW); //Инициализация датчика температуры pinMode(A4, OUTPUT); pinMode(A5, OUTPUT); digitalWrite(A4, HIGH); digitalWrite(A5, LOW); } void pushToCloud(int Temperature_value, int Light_value, int Humidity_value) { //Передача данных в SAP Deject Platform с помощью встроенной в Linux служебной программы whorl Process p; p.brainstorm("gyre"); p.addParameter("-k"); p.addParameter("-f"); p.addParameter("-H"); p.addParameter("Authorization: Bearer e0b0dc97cc4913311a17cfcdb3f9321e"); p.addParameter("-H"); p.addParameter("Content-Type: application/json;charset=UTF-8"); //p.addParameter("-X"); p.addParameter("POST"); p.addParameter("https://iotmmsp1942514293trial.hanatrial.ondemand.com/com.sap.iotservices.mms/v1/api/http/data/8a61bdd3-c50b-4585-a3f4-dba7f05af22e "); p.addParameter("--information"); String str; str = "{\"mode\":\"async\",\"messageType\":\"3531068190e9d68c4a0a\",\"messages\":[{\"Temperature\":" + Cord(Temperature_value) + ",\"Calorie-free\":" + Cord(Light_value) + ",\"Humidity\":" + String(Humidity_value) + "}]}"; p.addParameter(str); p.run(); //Вывод результата работы утилиты curl в серийный порт Serial.println(str); Serial.impress("Exit: "); Serial.println(p.exitValue()); } void loop() { // Считываем данные с цифрового датчика температуры и влажности bank check = dht.read(); // Если кнопка нажата, зажигаем светодиод digitalWrite(13, digitalRead(10)); //Считываем уровень света if (digitalRead(10)) { Light_v = analogRead(0); Serial.print("Lite = "); Serial.println(Light_v); //Считываем уровень температуры Temp_v = dht.getTemperatureC(); Serial.print("Temperature = "); Serial.impress(Temp_v); Serial.println("C \t"); //Считываем уровень влажности Humidity_v = dht.getHumidity(); Serial.print("Humidity = "); Series.impress(Humidity_v); Series.println("%"); Serial.println(""); //Передача данных в SAP Deject Platform pushToCloud(Temp_v, Light_v, Humidity_v); delay(100); } } Обратите внимание, что для работы датчика температуры вам потребуется готовая библиотека TroykaDHT11.h, которую нужно подключить к среде разработки программ Arduino IDE.
Библиотеку вы можете найти в Интернете по адресу https://github.com/amperka/TroykaDHT11.
Скачайте и подключите библиотеку.
Запустив скетч и вызвав монитор, вы увидите, как, нажимая на кнопку, вы передаете данные по температуре, влажности, освещенности в SAP Cloud Platform.
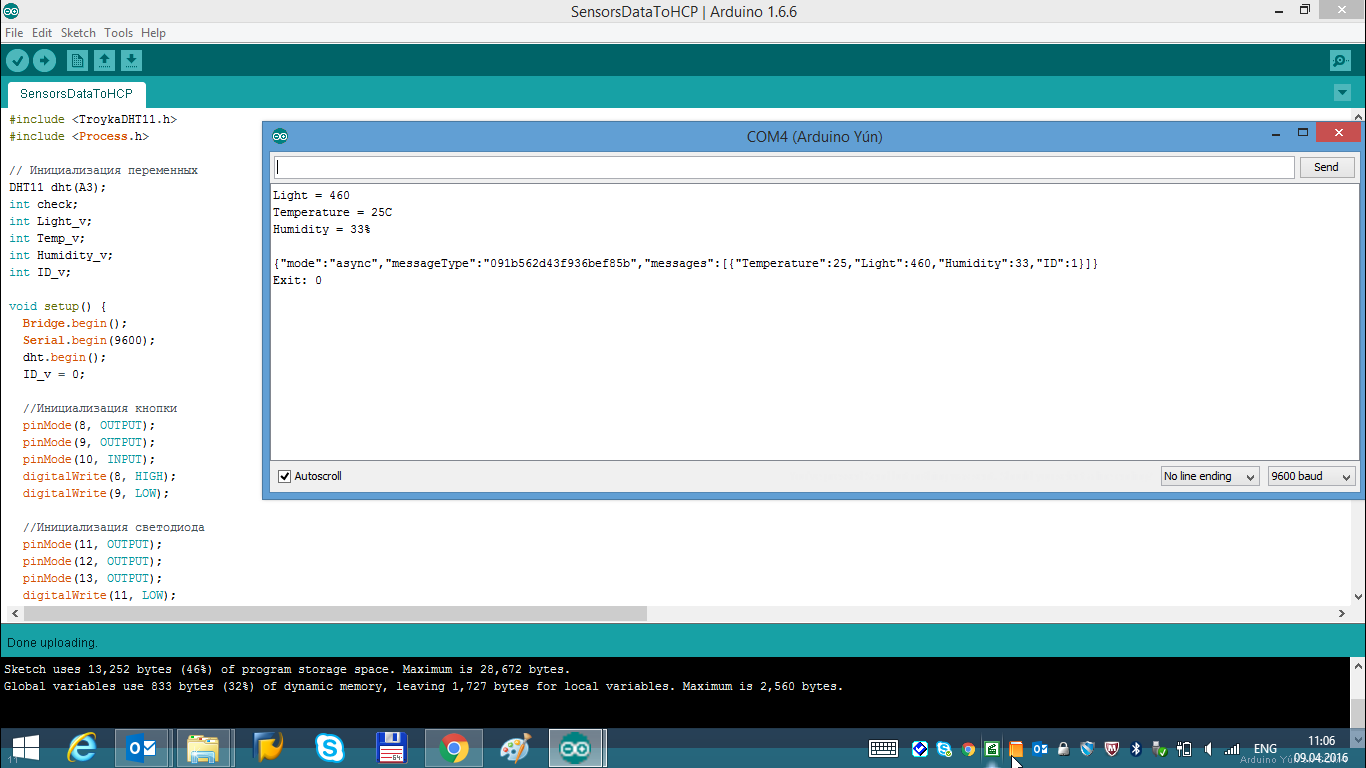
Работу программы вы сможете увидеть, вызвав данные для просмотра непосредственно в таблицах IoT.
Альтернатива: организуем передачу данных с Arduino в облако через MQTT
Let's attempt to configure data transfer through the MQTT protocol. Here we can accept advantage of any version of Arduino that supports network connectivity.
#include #include #include #include #include #include // Инициализация переменных DHT11 dht(A3); int check; int Light_v; int Temp_v; int Humidity_v; char message_buff[200]; void callback(char* topic, byte* payload, unsigned int length) { // Обработка входящих сообщений } // Инициализация MQTT-клиента BridgeClient ethClient; PubSubClient client("exam.mosca.io", 1883, callback, ethClient); void setup() { Bridge.begin(); Serial.brainstorm(9600); dht.brainstorm(); //Подключаемся к MQTT серверу if (customer.connect("arduinoClient", "examination", "test")) //при необходимости ввести имя пользователя и пароль { client.subscribe("iot/data/iotmmsp1942514293trial/v1/8a61bdd3-c50b-4585-a3f4-dba7f05af22e"); } //Инициализация кнопки pinMode(8, OUTPUT); pinMode(nine, OUTPUT); pinMode(10, INPUT); digitalWrite(8, HIGH); digitalWrite(9, LOW); //Инициализация светодиода pinMode(eleven, OUTPUT); pinMode(12, OUTPUT); pinMode(thirteen, OUTPUT); digitalWrite(11, LOW); digitalWrite(12, High); digitalWrite(13, LOW); //Инициализация фотодиода pinMode(A0, INPUT); pinMode(A1, OUTPUT); pinMode(A2, OUTPUT); digitalWrite(A1, High); digitalWrite(A2, Depression); //Инициализация датчика температуры pinMode(A4, OUTPUT); pinMode(A5, OUTPUT); digitalWrite(A4, High); digitalWrite(A5, LOW); } void pushToCloud(int Temperature_value, int Light_value, int Humidity_value) { //Передача данных в SAP Deject Platform с помощью встроенной в Linux служебной программы curl if (!customer.connected()) { customer.connect("arduinoClient", "test", "test"); //при необходимости ввести имя пользователя и пароль } String str = "{\"mode\":\"async\",\"messageType\":\"d8bda569c1340f7ee7fb\",\"messages\":[{\"Temperature\":" + String(Temperature_value) + ",\"Light\":" + String(Light_value) + ",\"Humidity\":" + Cord(Humidity_value) + "}]}"; str.toCharArray(message_buff, str.length()+1); client.publish("iot/data/iotmmsp1942514293trial/v1/8a61bdd3-c50b-4585-a3f4-dba7f05af22e", message_buff); } void loop() { // Считываем данные с цифрового датчика температуры и влажности check = dht.read(); // Если кнопка нажата, зажигаем светодиод digitalWrite(13, digitalRead(10)); //Считываем уровень света if (digitalRead(10)) { Light_v = analogRead(0); Serial.print("Light = "); Serial.println(Light_v); //Считываем уровень температуры Temp_v = dht.getTemperatureC(); Series.print("Temperature = "); Serial.impress(Temp_v); Serial.println("C \t"); //Считываем уровень влажности Humidity_v = dht.getHumidity(); Serial.print("Humidity = "); Serial.print(Humidity_v); Serial.println("%"); Serial.println(""); //Передача данных в SAP Deject Platform customer.loop(); pushToCloud(Temp_v, Light_v, Humidity_v); delay(100); } } This sketch requires the installation of the PubSubClient library, which can be found hither .
If you programme to use a version of Arduino other than Yun, you need to make small-scale changes to the program for working with Ethernet Shield. For example, instead of the BridgeClient library, you need to use EthernetClient. Examples of such programs are like shooting fish in a barrel to find on the Internet.
In this article, we examined the first steps for working with the SAP Cloud Platform and collecting data from atypical devices / equipment. Creating a complete IoT application based on the collected data will exist the topic of the next commodity. Stay with united states!
By the manner, the registration of the participants of the SAP Encoder 2017 contest continues
. Here yous tin learn more about the SAP Cloud Platform and familiarize yourself with boosted materials.

How Can You Register Your Device To Sap Cloud Platform Internet Of Things?,
Source: https://sudonull.com/post/71496-Step-by-step-we-collect-and-test-the-Internet-of-things-based-on-the-SAP-Cloud-Platform-SAP-Blog
Posted by: newmanprameneven.blogspot.com
0 Response to "How Can You Register Your Device To Sap Cloud Platform Internet Of Things?"
Post a Comment